


WordPress search indexing issues come in two kinds, and each one lives in a different index.
Either Google hasn’t added your pages to its index, or your own search bar can’t find content you’ve already published.
The fixes don’t cross over. The WordPress setting that hides a site from Google has no effect on what your search bar finds, and a complete site search index won’t get a single page into Google.
So the first job is working out which index is missing your content. Below, we’ll show you how to fix WordPress search indexing issues.
Site Search or Google: Which Indexing Problem Do You Have?
To start, pick a distinctive phrase from a post you know is published.
Next, type that phrase into your own site’s search bar. After that, search Google for site:yourdomain.com "your phrase" with your own domain in place.
If your site search comes back empty but Google finds the post, you have a site search indexing problem. If Google comes back empty, it’s a Google indexing problem, and the two can happen at the same time.
Here’s a quick way to match what you’re seeing to the tip that fixes it:
| What you’re seeing | Likely cause | Fix |
|---|---|---|
| A whole content type never shows up in site search | It was never added as a Source | Tip 1 |
| Site search finds a post by its title but not by a custom field, tag, or PDF text | That field isn’t an Attribute | Tip 2 |
| Content went missing after a migration, restore, or bulk import | The index is out of date | Tip 3 |
| New posts don’t show up, and the index never reaches 100% | The indexer is stuck | Tip 4 |
| Results change after you clear your site’s cache | An old results page is cached | Tip 5 |
| No pages from your site show up in Google at all | The site is asking search engines not to index it | Tip 6 |
| One page is missing from Google | A noindex tag, or Google hasn’t crawled it yet | Tip 7 |
Why WordPress Search Indexing Issues Cost You More Than Traffic
A missing page doesn’t throw an error, which is why indexing problems tend to sit unnoticed for weeks.
From our experience, it usually costs you in one of these ways:
- Visitors assume you don’t have it. An empty results page reads as “this site doesn’t cover that,” so the visitor heads back to Google and picks someone else.
- Shoppers can’t buy what they can’t find. In an online store, a product that isn’t in the index has no way in from the search bar, which is a common reason behind WooCommerce product search not working.
- Your inbox fills with questions your content already answers. When a help article doesn’t come up in search, readers email you instead of reading it.
- Google traffic can stop without any warning. A single checkbox left on after a site launch tells search engines to skip every page, and nothing on the front end looks broken.
Each one traces back to a setting you can check in your WordPress dashboard or in Google Search Console.
Fix WordPress Search Indexing Issues on Your Site
The easiest way to resolve any search indexing issues in WordPress is by using a search plugin like SearchWP.
SearchWP is the best WordPress search plugin, trusted by 50,000+ website owners. It replaces the default WordPress search with its own index and shows you exactly what’s in it.
Here are the features that matter most for indexing problems:
- A dedicated search index. SearchWP stores its index in separate database tables, so every search runs against a prebuilt list of keywords instead of scanning your posts on the fly.
- Sources and Attributes you control. You decide which content types get indexed and which fields inside them are searchable, down to single custom fields and taxonomies.
- Built-in index diagnostics. The Diagnostics screen lists entries that aren’t in the index yet and shows every keyword stored for any single entry.
- Indexing tools for when things stall. You can rebuild the index from the dashboard or WP-CLI, and wake up an indexer that has stopped partway through.
With that, let’s see how you can use SearchWP to find and fix what’s missing from your search index.
Install and Activate SearchWP
To start, visit the SearchWP website and sign up for a new account.
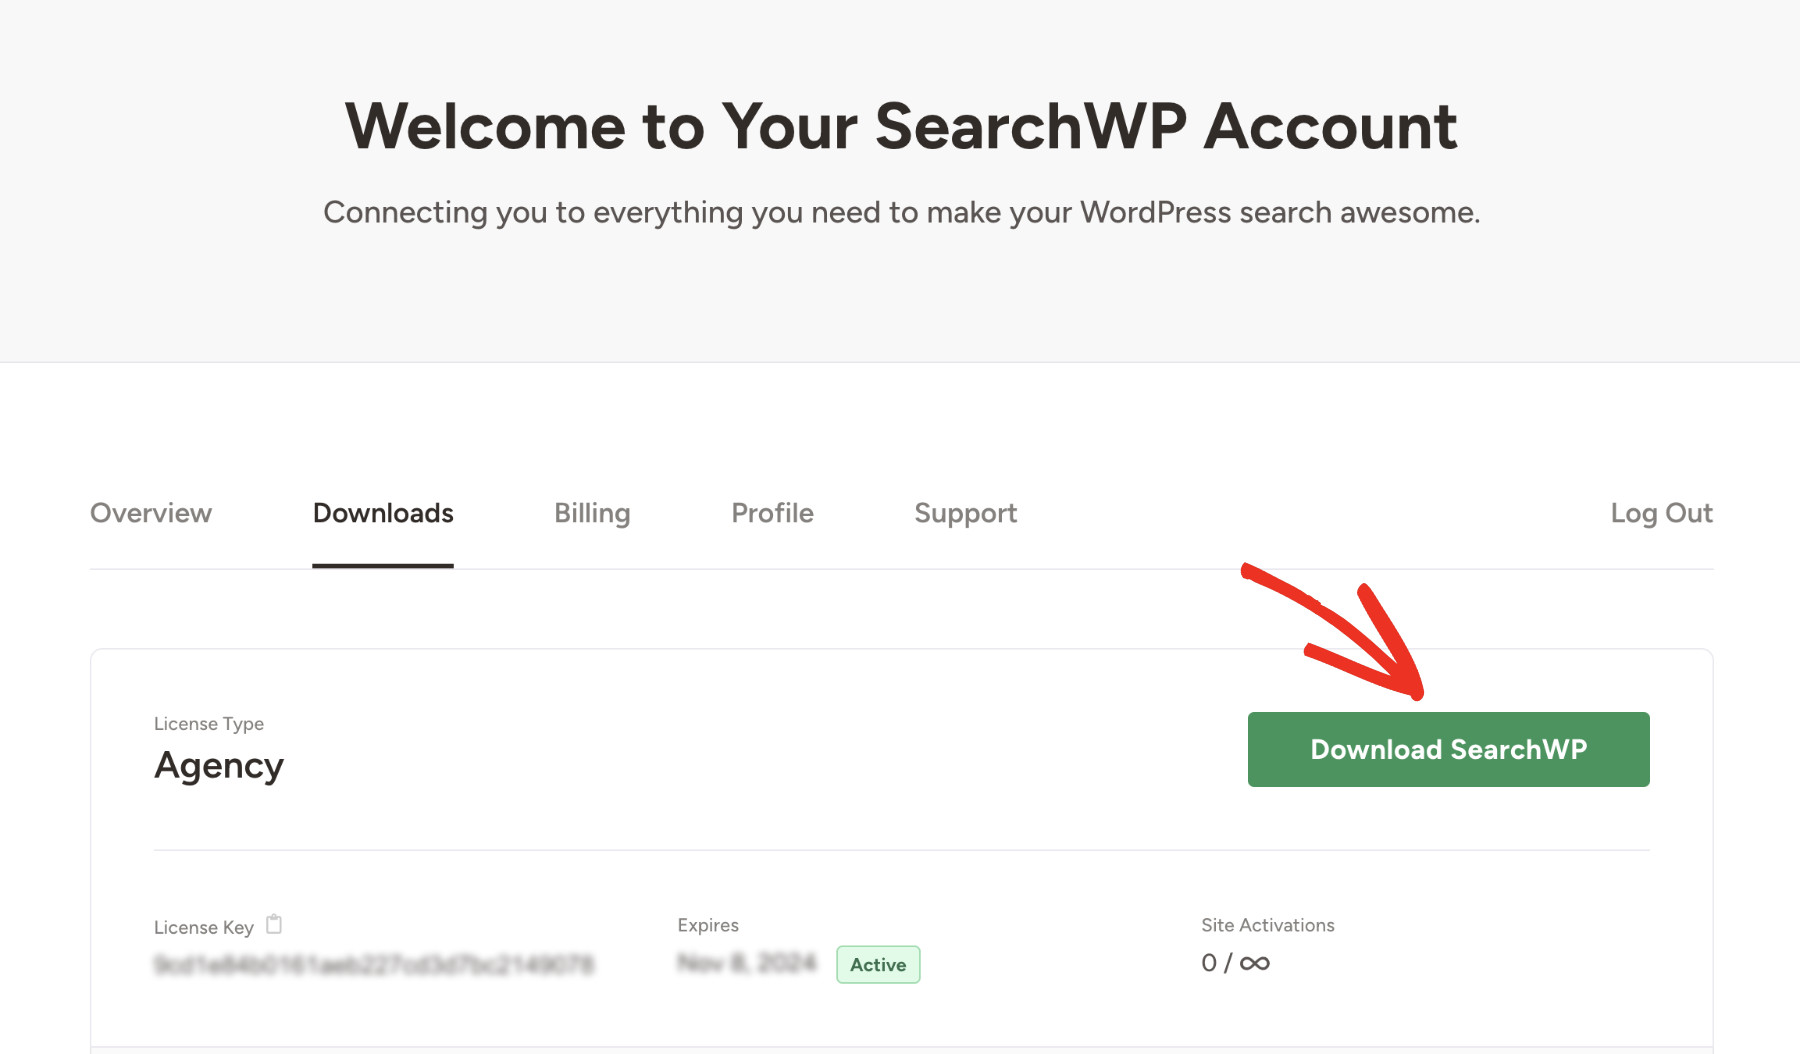
From there, go to the Downloads tab in your account dashboard. Next, click Download SearchWP and save the ZIP file to your computer. You’ll also want to copy your license key from the same tab.
After that, install and activate the plugin on your site. If you haven’t done this before, please see this guide on how to install a WordPress plugin.
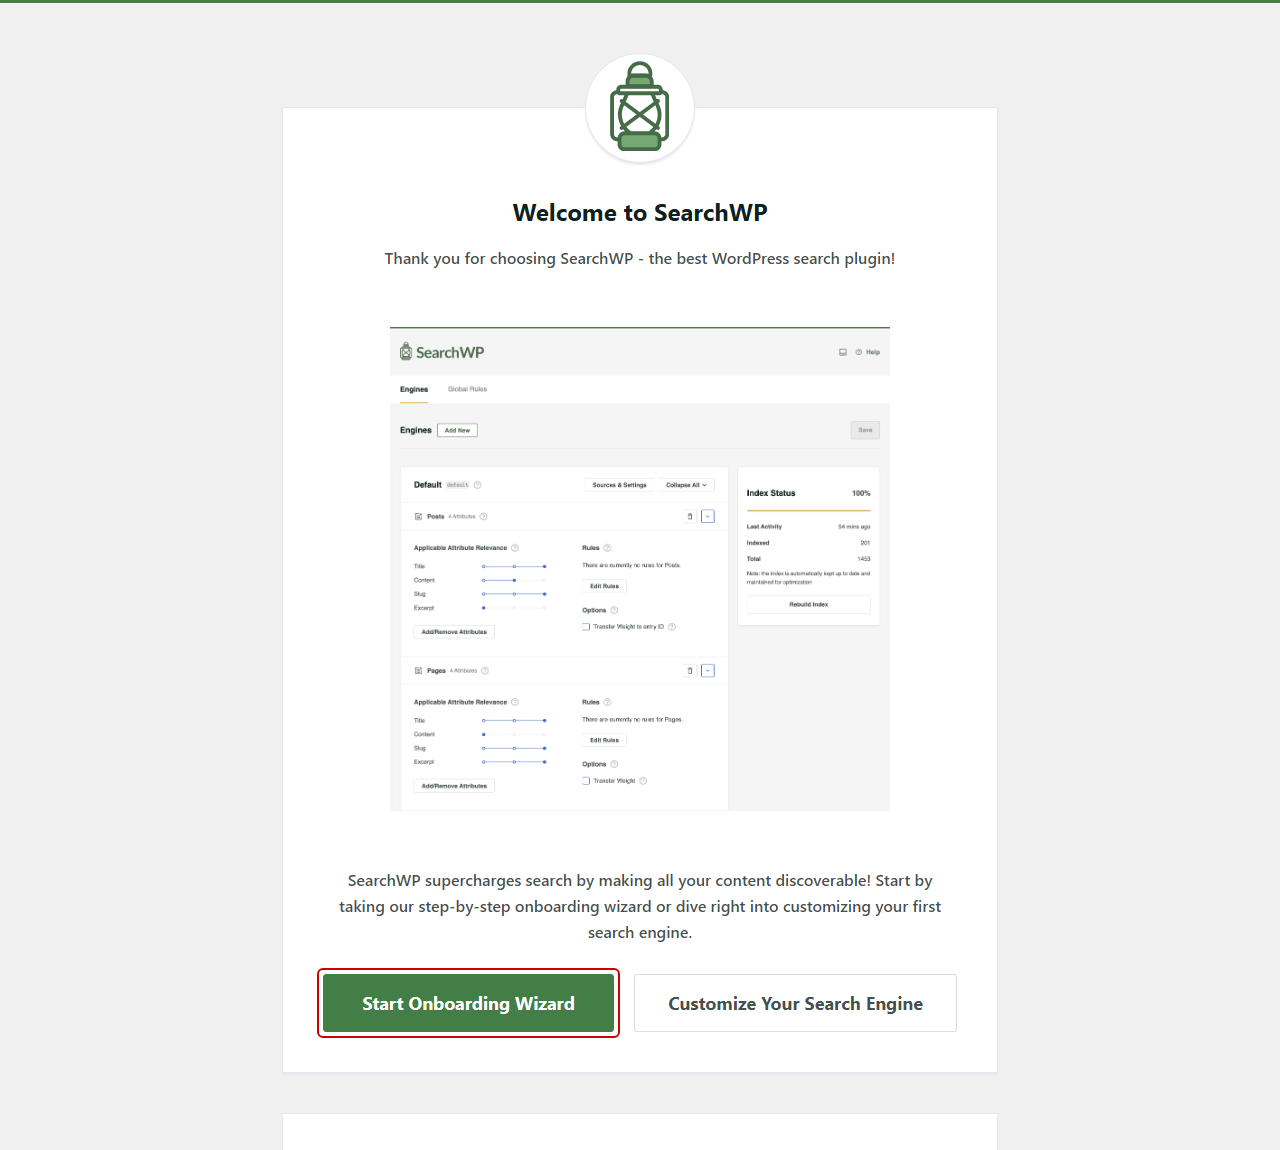
From there, click Start Onboarding Wizard and follow the on-screen instructions to add your license key and build your first index.
SearchWP is now running your site’s search, which means you can look inside the index.
Find What’s Missing From Your Search Index
Rather than guessing which content slipped through, you can ask SearchWP directly.
To do that, head over to SearchWP » Tools » Diagnostics in your WordPress dashboard.
The first panel, View Indexed Tokens for Source Entry, checks one item at a time. Pick the content type, enter the entry’s ID, then click View Tokens to see every keyword SearchWP stored for it.
Below that, the List Unindexed Entries panel checks a whole content type at once. Go ahead and choose it from the Source dropdown, then click View List.
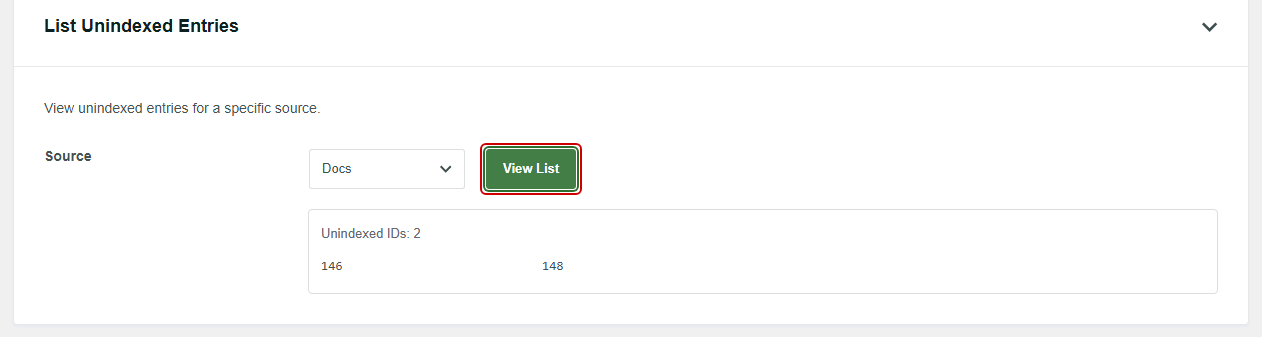
SearchWP lists the ID of each entry from that content type that isn’t in the index yet.
An empty list tells you something different. If an entry is indexed but a search for one of its keywords still misses it, that keyword is probably in a field that isn’t an Attribute, a Rule on the engine is filtering the entry out, or a cached page is in the way.
Note: The unindexed list shows up to 100 entries. On a large site, a full list of 100 usually means the indexer still has a backlog to work through.
SearchWP uses the tokens panel to settle the “is it indexed or not” question on one stubborn post.
Tip 1: Add the Missing Content Type as a Source
SearchWP indexes the Sources you turn on for an engine, not everything on your site by default. If a custom post type was never added, none of its content goes into the index.
You can confirm this in List Unindexed Entries. When the content type shows a list of entries, and it isn’t enabled on your engine, this tip is your fix.
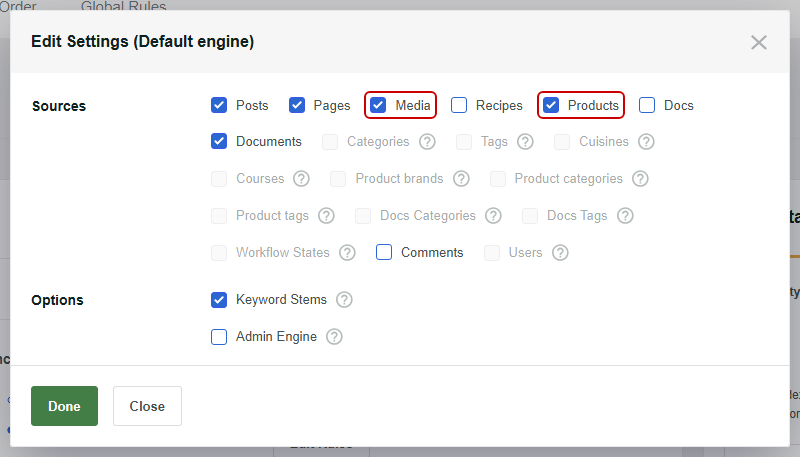
To fix it, go to SearchWP » Algorithm in your WordPress dashboard. From there, click Sources & Settings on your engine.
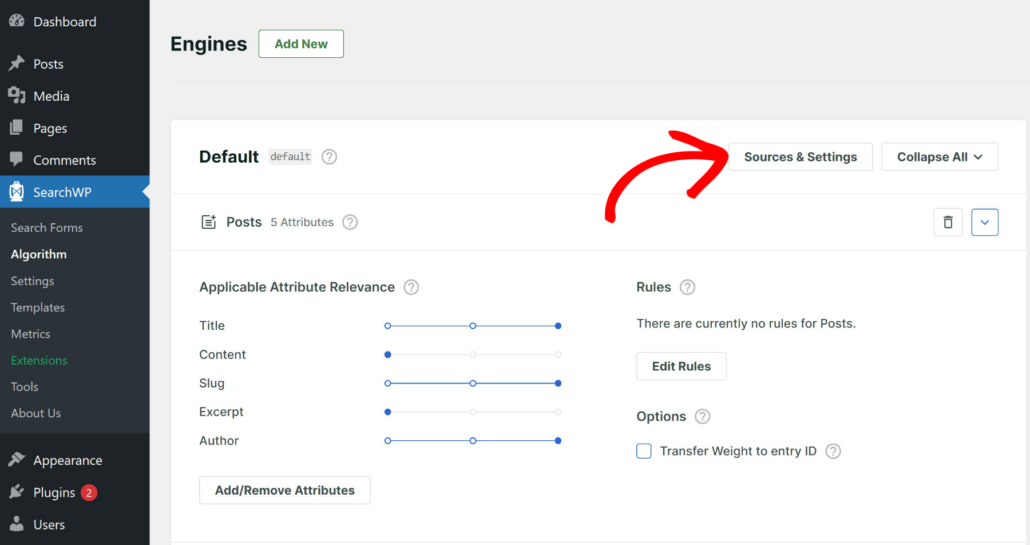
A panel will open with the Sources list.
Go ahead and check every content type you want searchable, such as Posts, Pages, Media, and any custom post types, then click Done.
After that, click Save to keep your engine changes.
Our guide on custom post type search not working covers this case in more detail. SearchWP’s engines documentation explains every engine setting.
Tip 2: Add Custom Fields, Taxonomies, and Document Content as Attributes
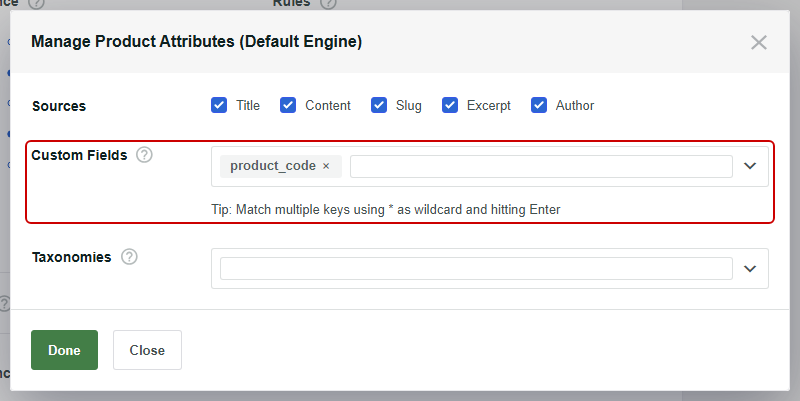
For most content types, turning on a Source covers its built-in fields, like the title, content, and author. Grouped fields like custom fields and taxonomies stay opt-in, so a product code held in a custom field isn’t searchable until you add it.
A custom post type registered as excluded from search starts with none of those fields switched on, so you’ll add them by hand.
You can confirm this with the tokens panel in Diagnostics. If the post is indexed but the keyword you searched for isn’t in its token list, the field holding that keyword isn’t an Attribute.
To fix it, go back to SearchWP » Algorithm and click Add/Remove Attributes for the Source.
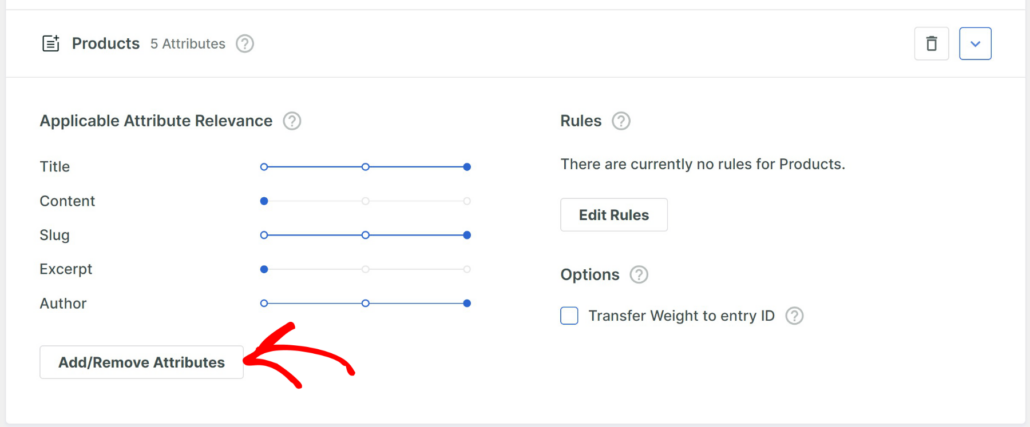
A modal will open listing every attribute for that content type. Custom Fields and Taxonomies each have a selection box where you pick the specific custom fields and taxonomies your visitors search by.
Once you’ve picked them, click Done. After that, click Save on the engine.
For the Media Source, Document Content is already switched on. That’s what makes the text inside your PDFs searchable.
We cover each field type in our guides on ACF fields and tags that aren’t searchable.
Tip 3: Rebuild the Index After a Migration, Restore, or Bulk Import
The search index lives in its own database tables, separate from your posts and pages. Moving a site, restoring a backup, or importing content in bulk can leave those tables out of step with what’s published.
You can confirm this when Diagnostics lists entries you know have been on the site for a while. It’s also the likely cause when the trouble started right after a migration.
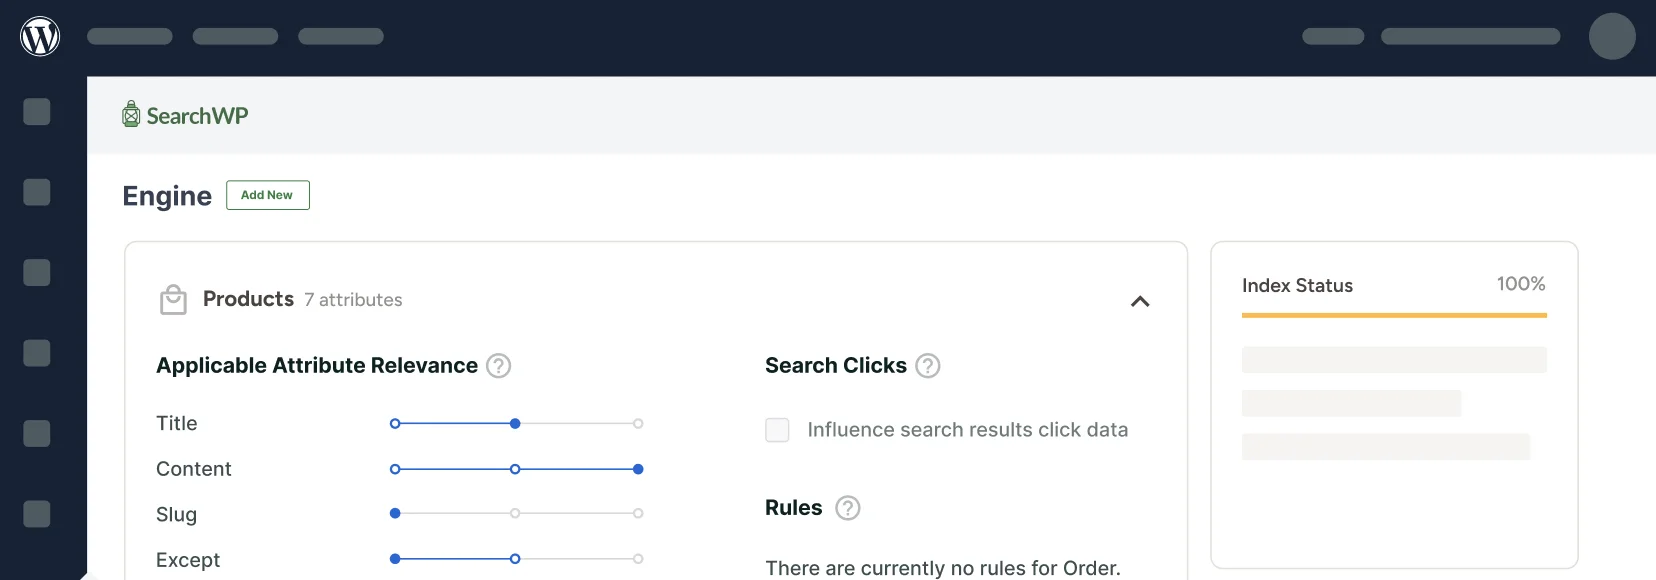
To fix it, head over to SearchWP » Algorithm. In the sidebar, you’ll see an Index Status heading with a percentage, and below that a Rebuild Index button.
A rebuild reindexes your whole site search from scratch. Go ahead and click Rebuild Index.
The first time you do this with Media enabled, SearchWP asks Reset Document Content? first. Leave the checkbox as it is and click Continue Index Rebuild.
Next, your browser asks you to confirm the rebuild. Click OK, then watch the Index Status percentage climb toward 100%.
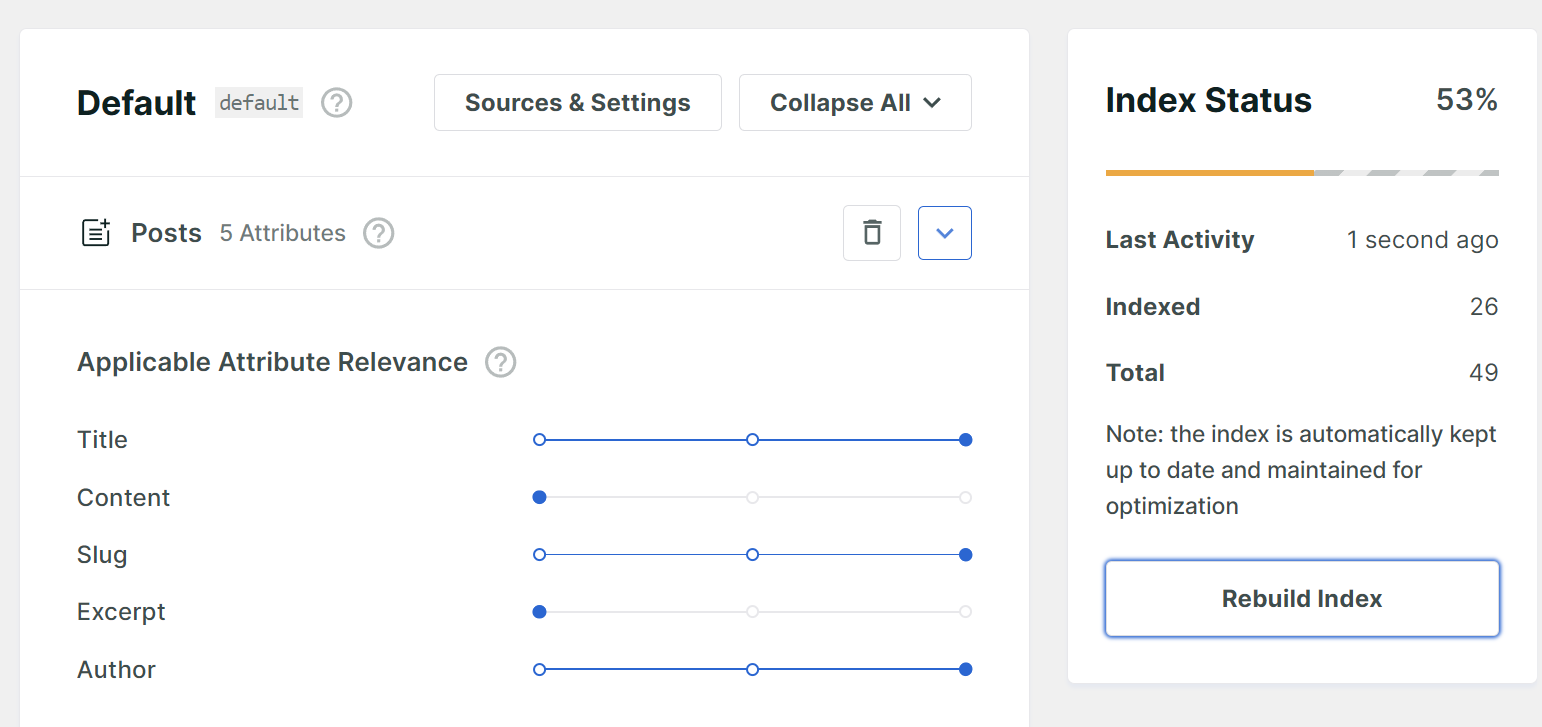
Letting the rebuild finish before you test is worth the wait. A rebuild sitting at 60% is still missing content, and that looks exactly like the problem you started with.
If you have WP-CLI on your server, wp searchwp index --rebuild drops and recreate the index from the command line. SearchWP’s WP-CLI documentation lists the other commands.
Pro Tip: A normal rebuild reuses document text SearchWP already extracted, so a corrected PDF can keep its old text. Turn on Re-parse Document Content under SearchWP » Settings » Misc before you rebuild, and our guide on how to make WordPress search PDF files covers the rest.
Tip 4: Restart a Stuck Indexer
When the search index is stuck and new posts never show up, the indexer has usually stopped.
SearchWP builds the index in the background by sending requests to your own site, with WP-Cron as a backup when those fail. Servers that block those requests, sites behind HTTP Basic Authentication, and custom code that throws errors can all stop the indexer partway through.
You can confirm this with the Index Status percentage stalling below 100%, and SearchWP may show a notice such as Indexer BLOCKED by HTTP Basic Authentication!
If your server can’t make those background requests at all, SearchWP shows a notice saying the window must be left open for the first index to build. In that case, keep the Algorithm screen open until the percentage reaches 100%.
For a stall, go to SearchWP » Settings » Misc. First, make sure Pause Indexing isn’t switched on, since new and updated content won’t be indexed while it is.
Next, check your PHP error log, which SearchWP recommends before restarting anything. A stuck indexer often points at a customization that needs fixing first.
After that, scroll to the Troubleshooting section and click Wake Up Indexer. A confirmation window opens, so click Continue to restart the background process.

If your host struggles to keep up, turn on Reduce Indexer Load on the same screen. It processes less data per pass, which is slower but easier on your server.
Tip 5: Clear Cached Search Results Pages
Sometimes the index is complete, and the problem is a page cache or CDN sitting in front of it. It can hand visitors a copy of a results page saved before your content was indexed.
You can confirm this by clearing your site’s cache and running the same search again. If the missing content appears straight away, the cache was the cause.
To stop it happening again, check your caching plugin or host’s settings for a way to exclude search results pages from the cache. WordPress search results load with an ?s= query in the URL, so that’s usually what the exclusion rule matches.
If your search shows other symptoms too, like a missing form or a 404 on the results page, our guide on WordPress search not working covers those separately.
Tip 6: Turn Off Discourage Search Engines From Indexing This Site
When a whole site is missing from Google, this is the first setting to check. It’s often switched on while a site is being built and then forgotten at launch.
When it’s on, WordPress adds a noindex, nofollow robots tag to every page. You can confirm it by going to Settings » Reading in your WordPress dashboard.
Look for the Search engine visibility row. On some sites it’s labeled Site visibility instead, when another plugin adds its own privacy options there.
If Discourage search engines from indexing this site is checked, uncheck it. From there, click Save Changes at the bottom of the screen.
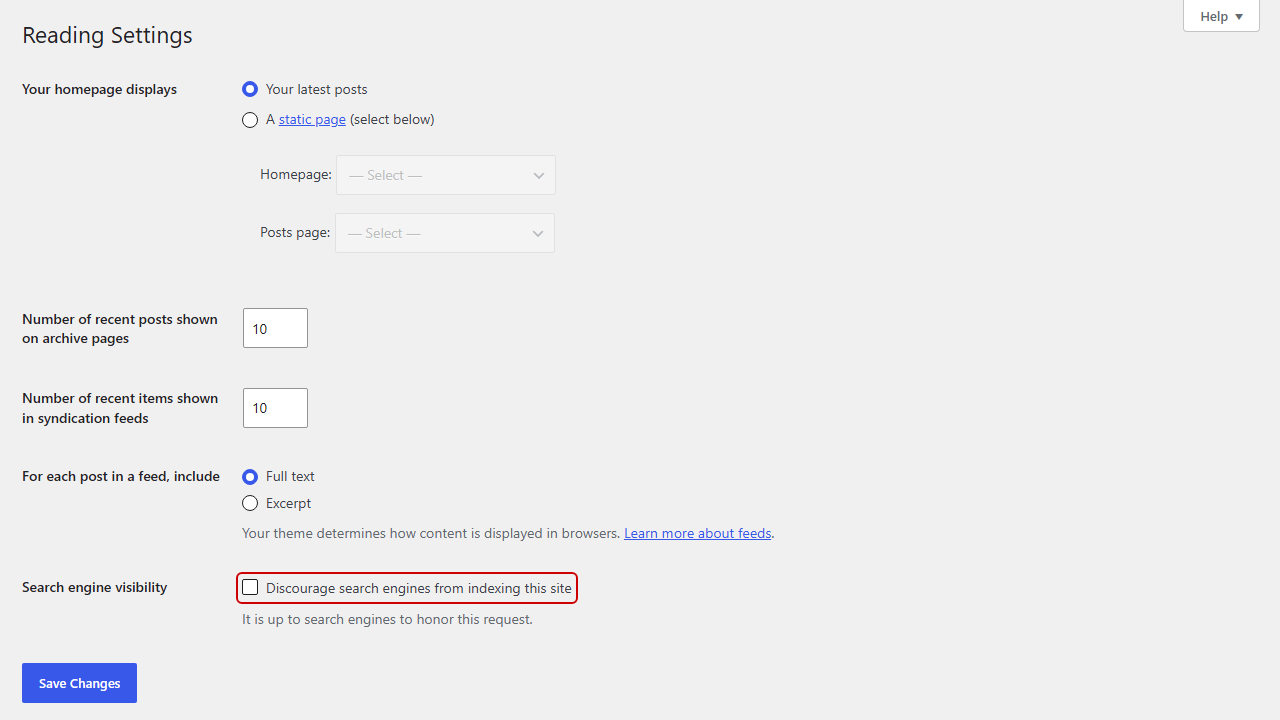
WordPress notes under the checkbox that it’s up to search engines to honor the request. Either way, this setting has no effect on your own site search.
Tip 7: Check for Noindex Tags in Google Search Console
When only one page is missing from Google, the usual causes are a noindex tag on that page or a page Google hasn’t crawled yet. Most SEO plugins include a per-page setting for this, so a page can be set to noindex even when the rest of the site is fine.
To confirm which it is, open Google Search Console and paste the page’s full URL into the inspection bar at the top. The URL Inspection tool tells you whether the page is indexed and, if it isn’t, why.
If it reports a noindex tag, open that page in WordPress and turn off the noindex option in your SEO plugin’s settings for the page. If it reports a blocked URL, check your robots.txt file, since the one WordPress generates on its own only blocks the /wp-admin/ folder.
Once you’ve fixed the cause, click Request indexing in the URL Inspection tool.
Google says a request doesn’t guarantee the page will be indexed, and there’s a daily limit on requests. So save it for pages you’ve fixed, rather than requesting every URL on the site.
You can learn more by following this guide on Google Search Console for WordPress.
How to Confirm Your Search Indexing Fix Worked
Once you’ve applied a fix, the last step is running the searches again.
For site search, start with the search that failed. On our demo store that sells boots, typing “waterproof boots” into the search bar should now bring back every pair the store carries.
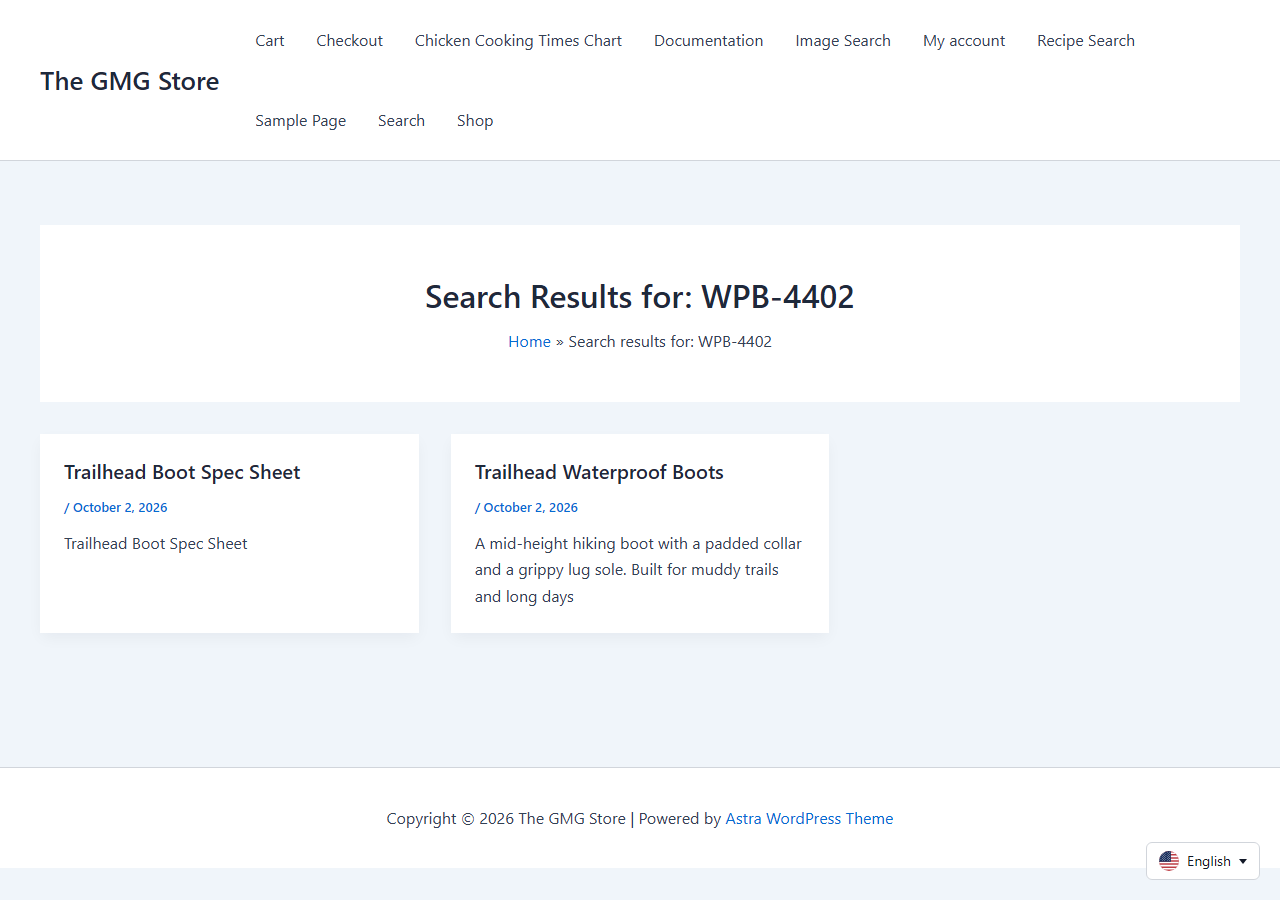
Next, search for a value that only exists in a custom field, such as the product code WPB-4402. The Trailhead Waterproof Boots product page should come back even though that code isn’t in its title or description.
After that, search for a phrase that only appears inside a document, such as Gore-Tex membrane from a boot spec sheet PDF. If the PDF shows up, your Media Source and its Document Content are both in the index.
For Google, open the URL Inspection tool on the page you fixed and click Test live URL. A clean live test means Google can access the page for indexing, though Google still decides whether and when it shows up in results.
Frequently Asked Questions
1. Why is my content missing from WordPress search results?
The content usually isn’t in your search index. Its content type may not be a Source on your engine, the field holding the keyword may not be an Attribute, or the index may not have finished building. In SearchWP, List Unindexed Entries under SearchWP » Tools » Diagnostics shows which entries aren’t in the index yet, and View Indexed Tokens for Source Entry shows whether a keyword was stored.
2. How do I rebuild the WordPress search index?
In SearchWP, go to SearchWP » Algorithm and click Rebuild Index in the sidebar, then confirm the rebuild. The Index Status percentage above the button tracks progress, so let it reach 100% before you test. On the command line, wp searchwp index --rebuild does the same job through WP-CLI.
3. Does “Discourage search engines from indexing this site” affect my site’s own search?
No, it only affects search engines like Google. The setting adds a noindex tag to your pages, and neither WordPress’s built-in search nor SearchWP checks it. If your own search bar is missing content, the cause is somewhere in your search index.
4. Why are my WordPress pages not indexed by Google?
The most common causes are the Discourage search engines from indexing this site setting under Settings » Reading, a noindex tag on the page, or a page Google hasn’t crawled yet. Google Search Console’s URL Inspection tool shows which one applies to a specific page.
5. Does WordPress have a built-in search index?
WordPress core doesn’t build a separate search index. A default search runs a WP_Query against your posts table, matching the search term against post titles, excerpts, and content. That’s why custom fields and taxonomy terms aren’t searched by default, and why a search plugin with its own index handles them instead.
You now have a quick way to tell which index is behind your WordPress search indexing issues, and a fix for each cause.
We hope this article helped you learn how to fix WordPress search indexing issues. You may also want to see our guides on how WordPress search works and ways to improve WordPress search.
Ready to make sure visitors find everything on your site? You can get started with SearchWP here, and every plan comes with a 14-day money-back guarantee.