


WordPress comes with a built-in search bar, and on the surface, it looks like it should work just fine. You type something in, hit enter, and the results show up.
But spend a little time digging into those results, and you’ll notice something odd. Relevant content keeps getting left out, and sometimes completely unrelated pages show up instead.
The truth is, the default WordPress search only looks at a small slice of your content. It scans post titles and body content, and that’s about it.
If you store important details in custom fields, use tags to organize posts, or sell products with specific attributes, none of that shows up in search results. Your content is there, but your visitors can’t find it.
We’ve seen this play out on all kinds of sites, from blogs to online stores to membership sites. The search bar sits there looking useful, but it’s quietly sending visitors away frustrated. That’s a real problem, because a visitor who can’t find what they need will simply go somewhere else.
In this tutorial, we’ll show you how to set up a search bar that actually works the way visitors expect it to.
Why Make A Search Bar That Searches Your WordPress Site?
Poor site navigation is one of the major reasons why people leave websites.
If you want to offer your site visitors the best user experience, you need to pay attention to your site search. Users need the search feature to find what they’re looking for on your website.
This is even more important if you have a large website with lots of content. Adding a powerful search bar that searches your site will save your visitors a ton of time.
If your site is experiencing a high bounce rate, it may be because your site visitors need to search through many pages and posts just to find what they’re looking for. Adding a search bar that searches everything on your site can help you reduce your bounce rate.
But adding just any search bar is not enough. You also want to make sure that your site’s search shows your visitors all the content you have to offer.
Take the default WordPress search for an example. It lacks power and doesn’t always give the user the results they need. Because it only scans titles, excerpts, and content bodies for keywords. Additionally, custom fields and content types created by plugins won’t be included in searches.
However, don’t lose hope. Are you ready to make a search bar that searches your site? We’ll show you how you can easily do it with the best search engine available on the market. So your users can find just what they are looking for!
How To Make a Search Bar That Searches Your WordPress Site
To make a search bar that searches your WordPress site content, you can start by getting SearchWP, the best WordPress search plugin.

It’s the go-to tool for everyone for improving WordPress website search capabilities. Even if you’re not tech-savvy, you can accomplish this with just a few clicks. No writing code!
SearchWP gives you full control over how you want your site to look for search terms, and your visitors get to enjoy instant, appropriate search results in seconds. Over 50,000 website owners already use the plugin to improve their business.
Here are some of the powerful features you get using SearchWP:
- Search your entire site. SearchWP indexes everything on your website. When your users type in the search bar, your site will look for results in product details, database table content, and even custom fields.
- Multiple search engines. You can use multiple search engines to create unique search experiences across your website pages. Configure each engine to meet your users’ needs at different points of their journey on your site.
- Text document indexing. Do you have PDF and Office documents on your website? With SearchWP, your search bar can index the full text inside PDF and Office documents. It’s really useful for sites that publish guides, manuals, or reports.
SearchWP will help you transform your site search and give your users the best experience possible. You can even use the plugin to add live autocomplete search to WordPress.
Here’s how to make a search bar that searches your WordPress site easily in 3 simple steps.
Step 1: Install and Activate SearchWP
To get started, you’ll need to visit the SearchWP website and sign up for a new account. Once you’ve signed up, log in to your SearchWP account dashboard and click on the Downloads tab.

From there, click the Download SearchWP button to save the plugin’s ZIP file to your computer. While you’re on that page, go ahead and copy your license key as well, because you’ll need it shortly to activate the plugin on your site.
Next, you’ll need to install SearchWP on your WordPress site. If you need a hand with this part, you can follow this beginner’s guide on how to install a WordPress plugin.
Once the plugin is active, you’ll see the SearchWP welcome screen along with the setup wizard. Go ahead and click the ‘Start Onboarding Wizard’ button and follow the onscreen instructions to complete the setup.

SearchWP is all set and ready for use! Now, it’s time to configure your first search engine.
Step 2: Set Up Your Search Engine
As soon as you’ve activated SearchWP, it starts indexing your website content right away! To verify, go to SearchWP » Algorithm from your WordPress dashboard.
Now, you can either choose to edit the default search engine according to your needs or add a new one.
SearchWP allows you to add multiple search engines to your website. This way, you can offer unique search experiences in different locations of your site.
To configure your search engine, simply click Sources & Settings.

Now, it’s time to select the sources you want SearchWP to look at when searching for results. By default, the posts, pages, and media sources will be selected.
But if you have an online store, then you can include eCommerce products as a source. You can learn more from our guide on how to improve WooCommerce product search.
You can also decide if you want support for keyword stemming (search for similar keywords). Plus, you can use SearchWP to search your WordPress admin backend by selecting the Admin Engine option.

Click ‘Done’ afterward once you finish making changes.
Next, you can further customize the attributes for each source. For instance, scroll down to the Posts source section and click the ‘Add/Remove Attributes’ button.

By default, SearchWP will look at the post title, content, slug, excerpt, and author for matches.
You can also include custom fields and taxonomies like post tags, categories, and more in your search process.

When finished, go ahead and click Done after choosing all your preferred attributes.
Also, you can add specific rules to customize the search experience further. To do this, click the Edit Rules button.

Now, a new popup will open to add and edit your rules.
To start, click + Add Rule to create a new rule.

With rules, you can choose to exclude or search for only posts that are published after a certain date or select a taxonomy (category or tag).
For instance, if you don’t want any posts from a certain category to appear in the search results, then you add a rule to exclude it.

Once you’ve added the rule, simply click Done.
Now, you can go ahead and click Save once you’re done configuring the search engine according to your needs.

SearchWP will then apply your new settings and build your search index again.
Step 3: Display The Search Bar On Your Site
Before you can display the search bar on your site, you first need to create a search form. The best part of using SearchWP is that you can create a search form with only a few clicks without worrying about writing code!
To create a search bar, go to SearchWP » Search Forms and click ‘Add New.’

On the next screen, you will see different options to customize your form.
To start, name the form, pick a theme layout, and configure it according to your needs.

Next, you can scroll down and pick the engine this search form will use, as SearchWP lets you set up multiple Engines to serve different content.
You can also select SearchWP as the Results page in order to take control and optimize the WordPress search results page.

When you’re done, click “Save” to complete setting up the Search Form.
To learn more about customizing the form, please see our guide on how to create an advanced search form in WordPress.

Now we are ready to display the search bar on any location of your website.
To do that, click Embed right next to the Save button at the top.

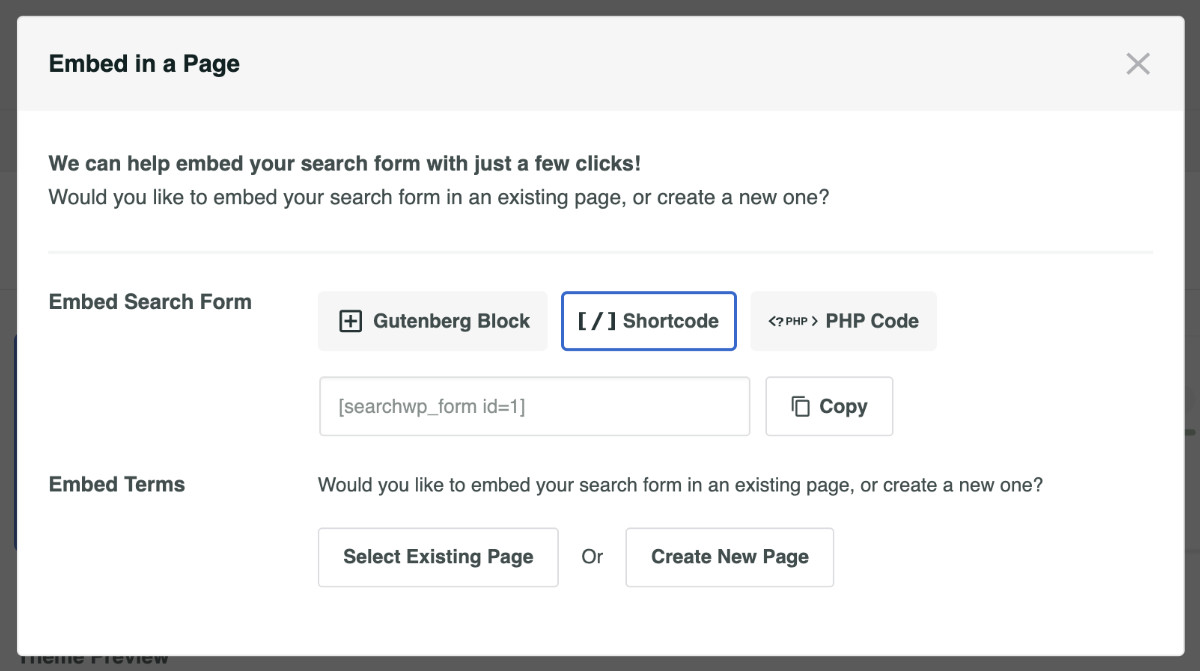
You’ll see instructions on how to embed the search form with only a few clicks.
For instance, if you want to put the search form using a shortcode, select Shortcode from the list, and you’ll be presented with the shortcode associated with the form. Simply copy and paste it to your desired location.
For this tutorial, let’s see how you can add a search bar to your WordPress site using a Gutenberg Block.
It’s pretty simple. Just open the page where you want to display the search bar in Edit mode and then click the + icon.

Next, you can look for the SearchWP Form block. Go ahead and select it.
After adding the SearchWP Form block, you can pick the search form you just created.
Simply click the dropdown menu in the block to choose your search form from the list. That’s it!

Congratulations! You’ve just learned how to make a search bar that searches your WordPress site.
Here’s a preview of what it looks like on our demo site.

You can now go a step further and test your search form. See if it is showing content from different categories, check if it’s obeying the rules you set up, and test for accuracy.
FAQs About WordPress Search Bars
Here are some of the most common questions about setting up and improving their WordPress search bar.
1. Will SearchWP replace my existing search bar automatically?
Once you install and activate SearchWP, it automatically takes over the default WordPress search. You don’t need to swap out any code or move anything around. Your existing search bar will start using SearchWP right away.
2. Can I add a search bar to a specific page or post?
Absolutely. SearchWP lets you create custom search forms and embed them anywhere on your site. You can use a Gutenberg block, a shortcode, or a widget to place your search bar exactly where you want it.
3. Will SearchWP work with my WordPress theme?
In our experience, SearchWP works well with almost every WordPress theme out there. It’s also compatible with popular page builders like Elementor, Divi, Beaver Builder, and WPBakery.
4. Can the search bar find content inside PDF files?
Yes, it can. SearchWP has a document indexing feature that lets your search bar find text inside uploaded PDF files and other documents. This is really useful for sites that publish guides, manuals, or reports.
5. What if my visitors make typos when searching?
SearchWP has a fuzzy search feature that handles typos really well. When it’s turned on, your search bar will still return relevant results even if a visitor misspells a word.
6. Can I see what my visitors are searching for?
SearchWP includes a Metrics extension that tracks every search made on your site. You can view this data right inside your WordPress dashboard, which is great for understanding what your visitors are looking for.
Now, when visitors roam around your website, they’ll see a search bar that can search everything on your website. You can use this feature to improve your site’s user experience and help your customers find the content they need faster.
We hope this article helped you learn how to make a search bar that searches your WordPress site. You may also want to see our guides on how to make multilingual sites searchable in WordPress and how to change the order of search results on your site.
Get SearchWP now to add an advanced search bar to your website!


