Do you want to know how to create product search in WooCommerce?
It’ll help your visitors find the products they’re looking for faster, improve their user experience, and increase your profits.
In this guide, we’ll show you how you can create a smart product search on your site in a few simple steps, with no coding needed.
Let’s begin!
Why Create Product Search in WooCommerce?
The default WordPress search engine sees no difference between WooCommerce products and regular posts and pages.
It makes it harder for your customers to find the products they came for since they get a lot of redundant search results.
Plus, WordPress completely ignores WooCommerce product attributes when performing a search.
Due to that, your customers can’t search for products by color options, size, SKU, and more.
Thankfully, you can easily tackle both of these problems by creating a product search. It’ll help you:
- Clean up your search results. Limit search on your site to WooCommerce products so that nothing distracts your customers from shopping.
- Enable search by product attributes. Make product attributes searchable on your site to make it easier for your customers to find the products they want.
- Boost your sales. The easier it is for visitors to find the right product in your store, the more sales you’ll make.
- Build a loyal customer base. Happy customers who’ve had a positive user experience browsing your store are more likely to come again.
- Improve your site’s SEO. When visitors spend a lot of time on your site, that’s a good signal to Google that it’s worth ranking higher in search results.
After you’ve learned why WooCommerce product search is essential, let’s see how you can add it to your site.
How to Make a Smart WooCommerce Product Search
The easiest way to make a WooCommerce product search on your site is to use a plugin like SearchWP.

This is the most powerful and easy-to-use WordPress search plugin trusted by over 50,000 website owners worldwide.
SearchWP has seamless integration with WooCommerce, allowing you to fully customize WooCommerce product search to meet your needs.
For example, you can enable search by product SKUs, make product attributes searchable, add search by WooCommerce categories, and many more.
Here are some other SearchWP features that will boost your search and help grow your business:
- Exclude specific products from search: Hide redundant products from search results to clean them up and help your customers find what they’re looking for faster.
- Track searches of your customers: Find out what searches customers perform on your site to come up with new product ideas and meet their needs.
- Customize your search results page: Change the appearance of your search results page to promote your products, collect emails, or anything else.
- Add multiple search forms to your site: Place additional search forms on your site to encourage customers to use them and discover more of your products.
With that, let’s see how you can use SearchWP to enhance WooCommerce product search on your site.
Step 1: Install and Activate SearchWP
To get started, you can go to visit the website and grab your copy of SearchWP.
Once done, you’ll need to log in to your SearchWP account and navigate to the Downloads tab.

Next, press the Download SearchWP button to start downloading the plugin’s ZIP file to your computer.
After downloading, you should also copy the license key in the bottom left corner on the same page.
Now the next step is to upload the ZIP file you downloaded to your site and install SearchWP. If you need help with that, then you can check out this detailed step-by-step tutorial on how to install a WordPress plugin.
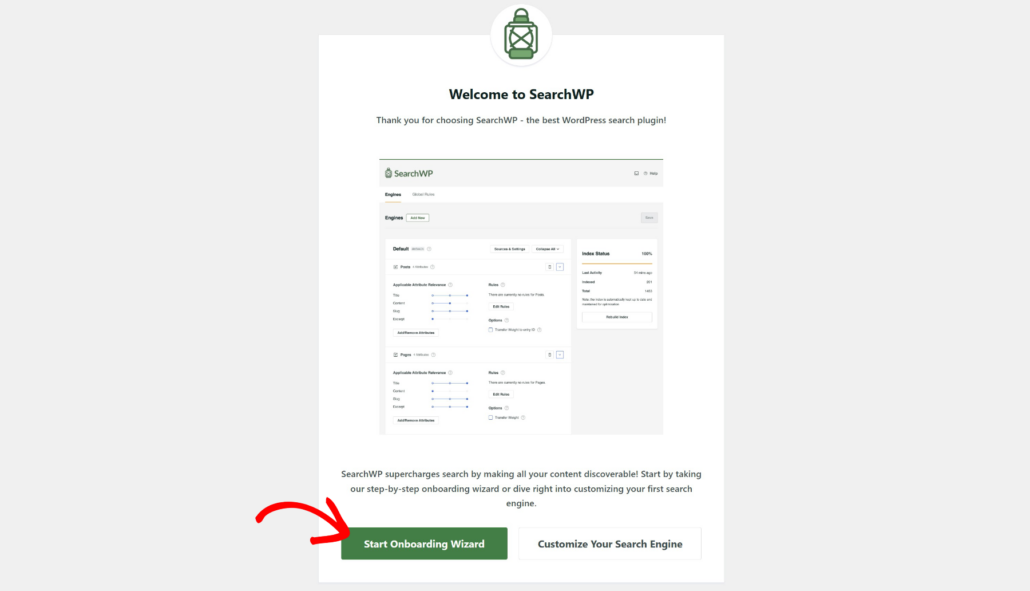
Once you install and activate SearchWP, you’ll see the setup wizard. Simply click the ‘Start Onboarding Wizard’ button and follow the onscreen instructions.
After installing and activating SearchWP on your site, the next step is to install the WooCommerce integration extension.
Step 2: Install the SearchWP WooCommerce Integration Extension
The extension ensures seamless integration of SearchWP and WooCommerce plugins, allowing you to make product searches much smarter.
Plus, if you’re using the WooCommerce search form, then the extension helps display results using the SearchWP engine.
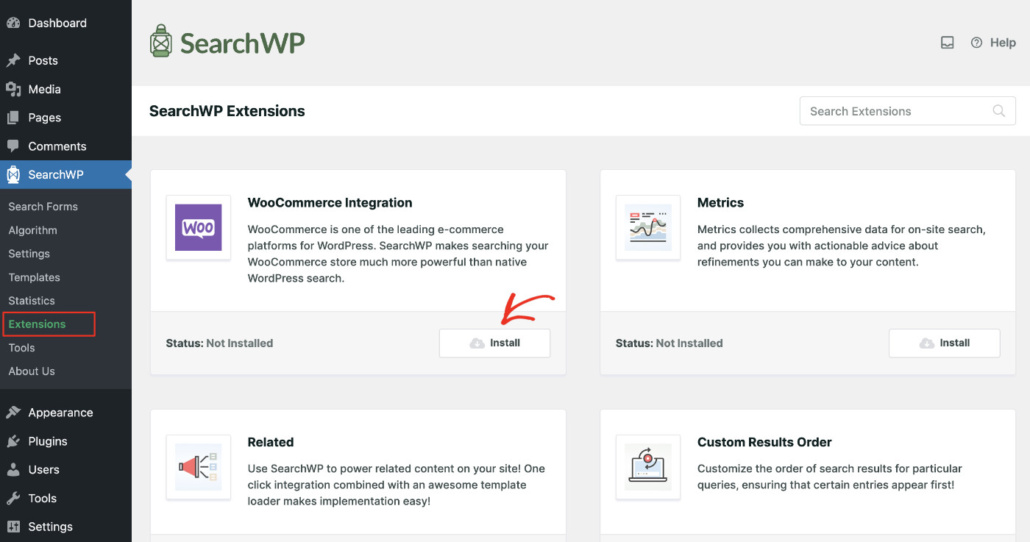
To install it, you can navigate to SearchWP » Extensions from your WordPress dashboard. Then, find the WooCommerce Integration extension and click the Install button.
After installing and activating the extension, you’re ready to start setting up your search engine.
Step 3: Set Up Your Custom Search Engine
A search engine includes a set of rules and conditions that SearchWP relies on when performing a search.
With SearchWP, you can completely customize them to meet your needs and change the way search works on your site.
For example, you can manage search sources, exclude specific pages or categories from search, adjust attribute relevance weights, and much more.
The best part is that SearchWP allows you to add multiple search engines and link them to individual search forms throughout your site. This way, you can create fully customized search forms with a unique set of rules and conditions.
Right now, there is only the Default search engine, which SearchWP automatically creates after installation. You can add new engines as well, but for this tutorial, we’ll customize the default engine.
Limit Search to WooCommerce Products
First, you’ll need to visit the SearchWP » Algorithm page from your WordPress dashboard.
From here, you can click the Sources & Settings button and see which sources the native search engine will include while searching.
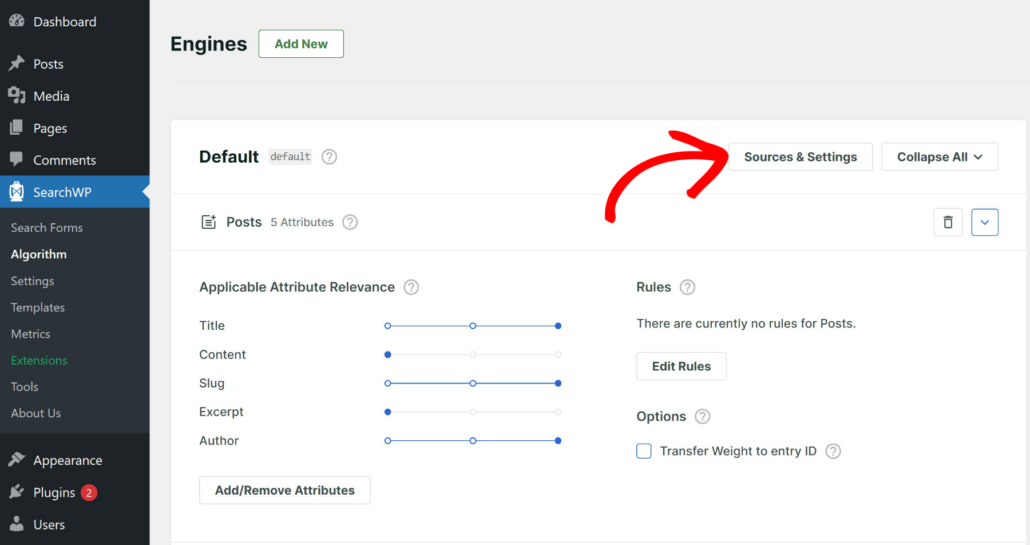
You’ll notice that the Default search engine will have 3 search sources: Posts, Pages, and Media.
To create a smart product search, you can limit the search to WooCommerce products as a source.
Let’s uncheck all other search sources except Products, so that customers can only see our products among search results.
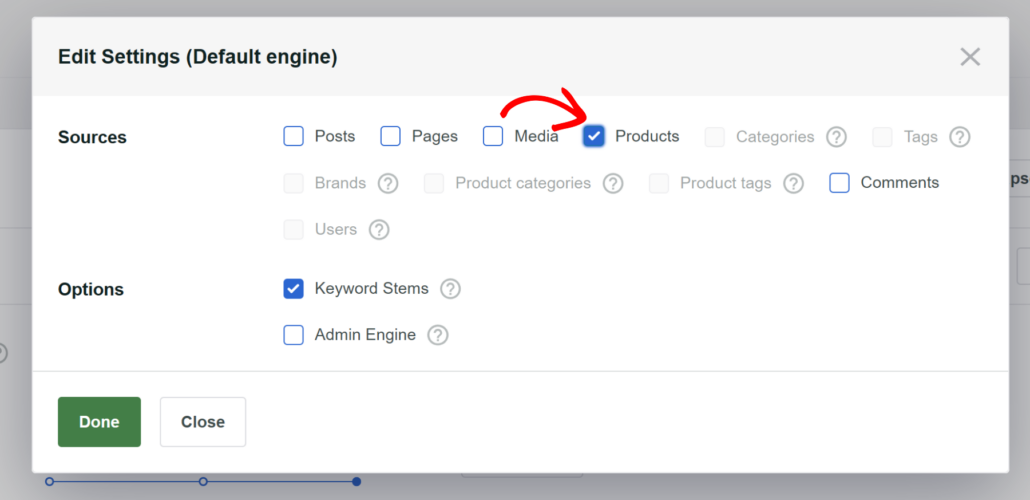
When you’re finished customizing your search sources, press Done to save the changes.
Make New Product Attributes Searchable
You can also completely remove attributes from a search source or add new ones.
To get started, scroll down to the Products source section and press the Add/Remove Attributes button.
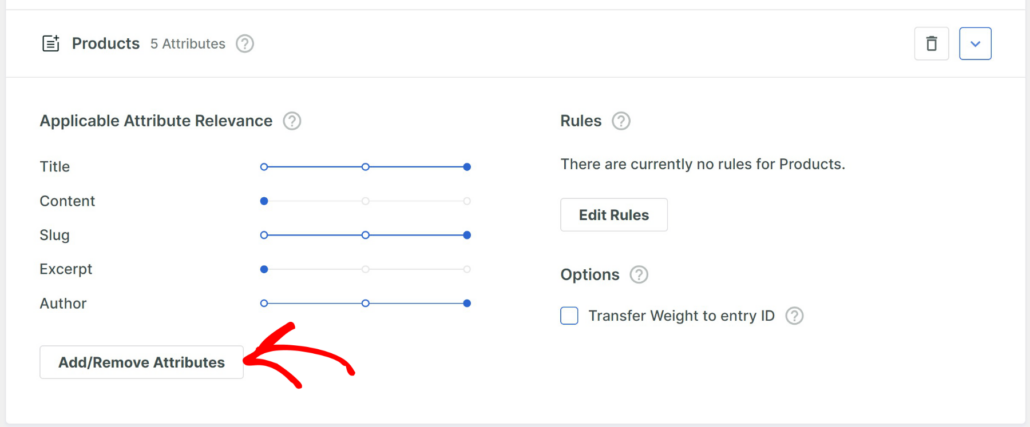
By default, SearchWP will use the title, content, slug, excerpt, and author as attributes for a source.
If you want to remove any default attributes, simply uncheck the boxes.
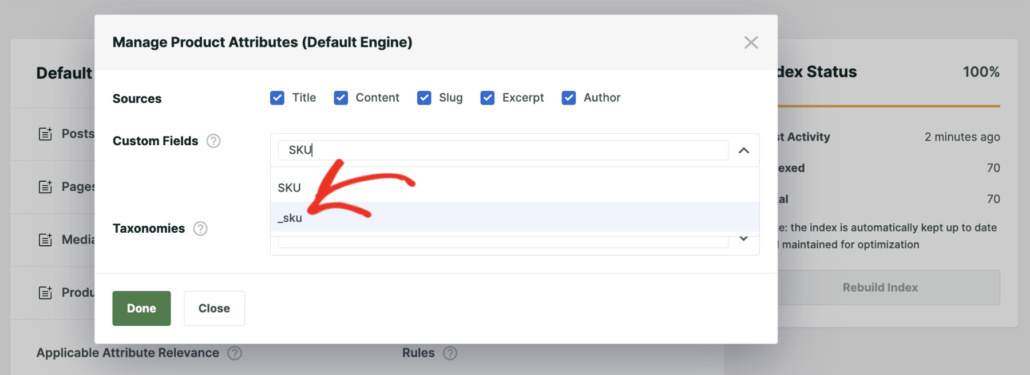
To add new attributes, you can click on the Custom Fields or Taxonomies field, depending on what you want to add. Then, start typing the name of an attribute you want to make searchable until the dropdown menu of available attributes pops up.
For example, you can add _sku to make product SKUs searchable on your site.
There is also a way to quickly make other product attributes searchable, such as color, price, size, and so on.
Let Your Customers Search by Product Tags
You can also allow our customers to search by product tags.
First, you can click on the Taxonomies field.
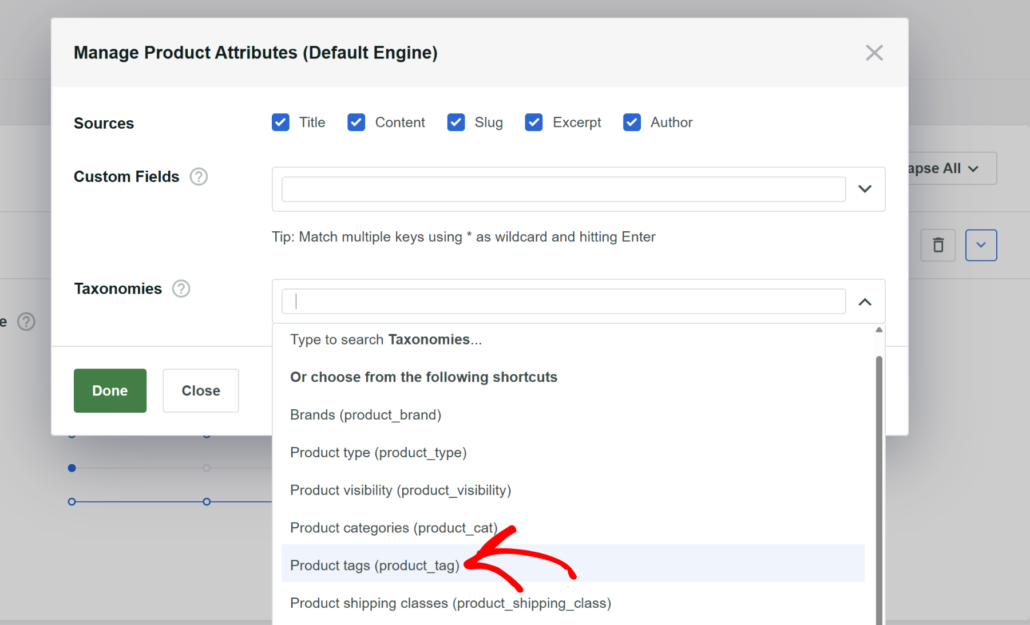
Then, find the Product tags option and click on it to add tags as an attribute.
When you’ve finished managing your search engine attributes, click Done to save the changes you’ve made.
Manage WooCommerce Categories You Want to Appear in Search
Along with tags, SearchWP also allows you to add product categories to the search process.
This allows users to find entire categories instead of looking for a single product.
You can do this by adding the Product categories under the Taxonomies section when managing the attributes.
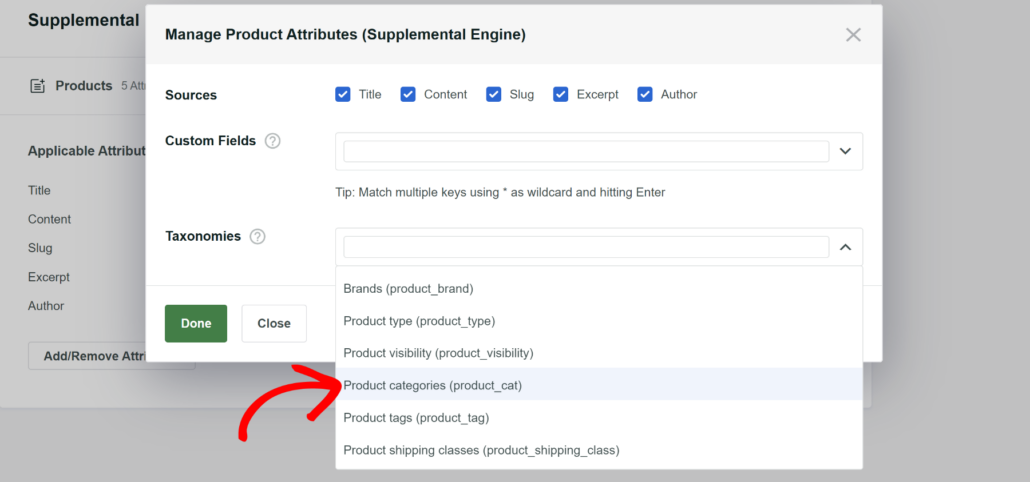
When you’re finished, click the ‘Done’ button.
Besides that, you can also exclude some WooCommerce product categories from search on our site.
To get started, press the Edit Rules button.
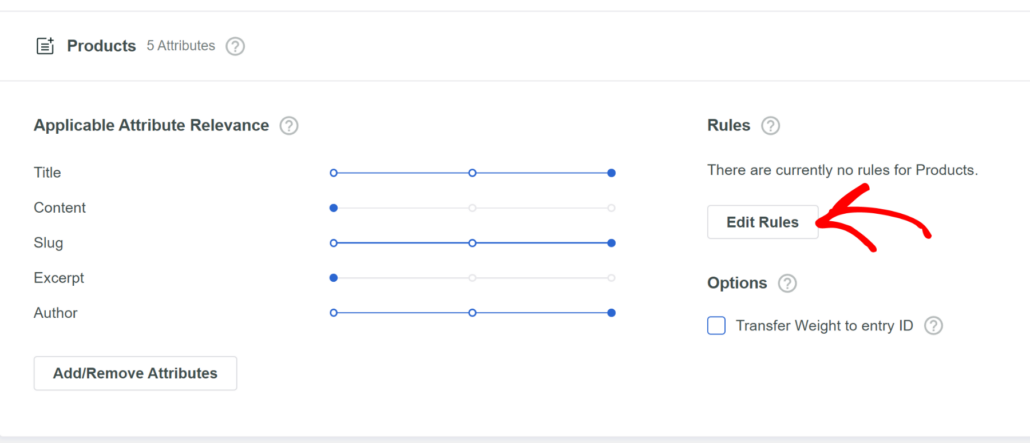
Next, a new popup window will .
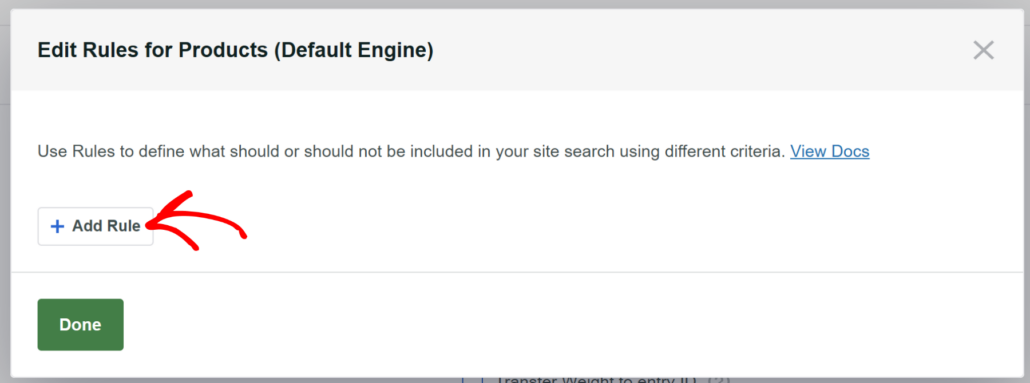
Initially, you won’t see any rules. To get started, simply click Add Rule.
On the next screen, you can set different conditions to exclude product categories.
First, you’ll need to click on the Only show entries if menu and change it to Exclude entries if.
Once you’ve done that, you can select Taxonomy and then select ‘Product categories (product_cat)’ from the dropdown menu.
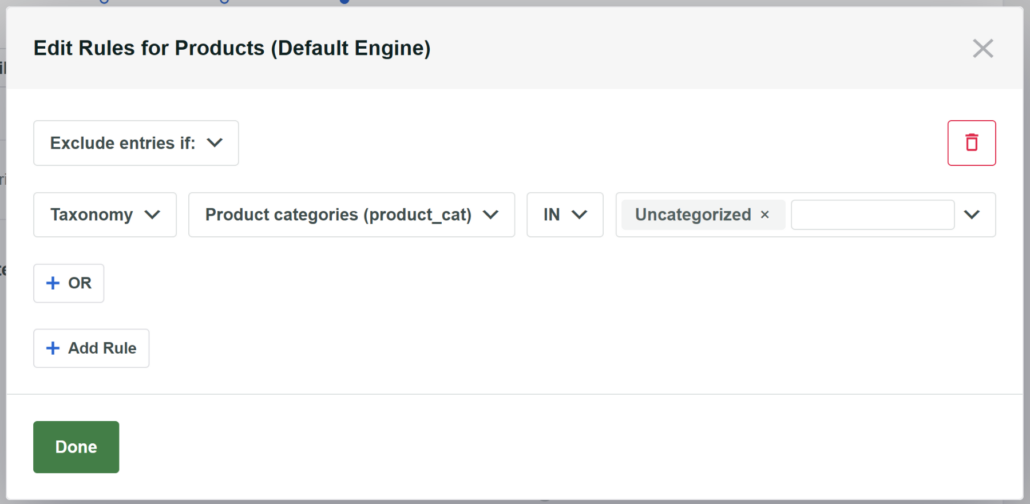
Next, you can enter the name of the category you want to exclude from the search in the rightmost field.
For example, let’s say you want to exclude the ‘Uncategorized’ category from the search.
When you’re satisfied with excluded categories, press Done.
To learn more, please see our guide on how you can exclude any product from search in WooCommerce.
Save Your Customized Search Engine
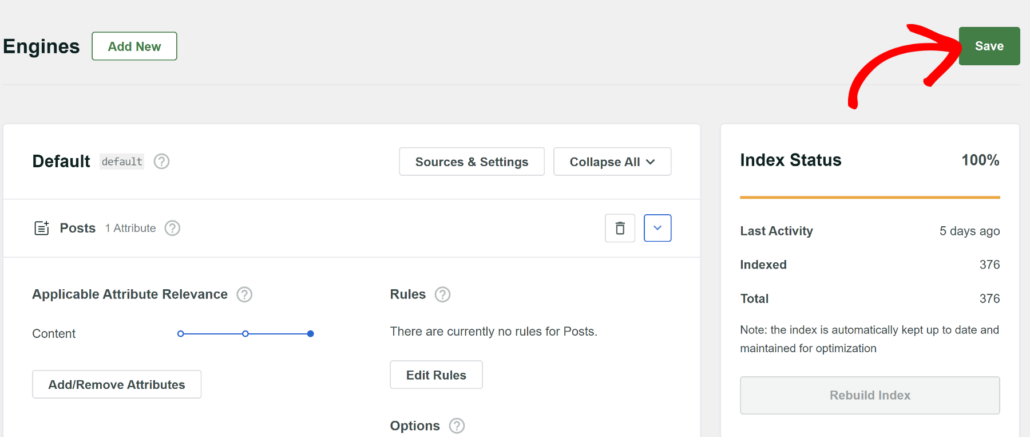
The final step is to save all changes you made to your search engine.
To do that, simply press the Save button in the upper right corner.
That’s it. Now you have a smart WooCommerce product search on your site.
Let’s test it out and see how it works.
Step 4: Test Your New Product Search
To do that, you’ll need to leave your WordPress dashboard and go over to your site.
There are several posts on our test site about how to choose a nice beanie for each season.

Let’s try to search for “beanie” and see what results we get.
As you can see, there are only products among search results even though we have a few articles on the same topic.

It means that the rule we added to our search engine works, and WordPress performs searches only among products.
Let’s also check if we can find a product by the tag. We have a product on our test site called Warm Jacket.
It doesn’t have any description, hasn’t been added to any category, but has the Winter Clothes tag.

Let’s see if we can find this product by its tag alone.
As you can see, we successfully found the product.

It means that WordPress now considers product tags when performing a search.
Bonus: Create a Search Page in WooCommerce
Using SearchWP, you can add a search form to a separate page to give your visitors a more convenient way to search for products.
A separate search page helps you narrow your search results, promote your products, collect emails, and more.
The best part is that SearchWP now supports some of the most popular site builders, like Elementor, Divi, Beaver Builder, and Oxygen.
Here is an example of how it looks on our test site:

For more information, check out our step-by-step guide on how to create a search page in WordPress.
FAQs About Product Search in WooCommerce
Here are some common questions users have about creating a product search for WooCommerce.
1. Why should I create a product search in WooCommerce?
Creating a product search in WooCommerce enhances user experience by allowing visitors to efficiently find the products they seek. It limits the search to WooCommerce products and enables searches by product attributes like color, size, and SKU, improving site navigation and potentially boosting sales.
2. Can I add a search form to a specific page on my WooCommerce site?
Yes, SearchWP allows you to add a search form to a separate page by using dedicated blocks. Plus, it also supports popular site builders like Elementor or Divi, allowing to your create custom search pages.
3. What plugin can I use to create a smart WooCommerce product search?
SearchWP is a widely recommended plugin for enhancing WooCommerce’s search capabilities. It offers functionalities like searching by custom fields, product categories, tags, and more, and is trusted by over 50,000 sites for its seamless integration with WooCommerce.
What’s Next…
Creating a smart WooCommerce search helps your visitors find the right products, improve their user experience and boost your sales.
We hope this article helped you learn how to create a product search in WooCommerce in a few simple steps.
You may also want to see our guides on how to fix WooCommerce product search not working and how to add a WooCommerce search form to your shop page.
If you’re ready to enhance search on your site and grow your business, you can get started with SearchWP here.
