


Did you know that your visitors expect to find what they’re looking for the moment they use the search bar? When results are good, they stay and convert.
A search form lets visitors quickly find specific content, products, or information on your website without having to navigate multiple pages.
This saves time and enables them to take the desired action faster, whether it is to make a purchase or read content, depending on the nature of your website.
In this article, we’ll show you how to create a custom search form in WordPress in 3 easy steps.
What Is A Custom WordPress Search Form?
A custom search form is a search box you’ve set up specifically for your site. You control what it searches, how it looks, and where it appears on your pages.
The default WordPress search bar is a one-size-fits-all form that ships with every install.
A custom search form is designed around your content, your branding, and your visitors.
That said, let’s see why you need a custom search form for your WordPress site.
Why Having A Search Form Is Important
There are plenty of websites on the Internet without a search form because they are optional. But having a search form can greatly accelerate your growth.
Imagine a retail business in your neighborhood that sells various home goods. Everything from furniture to kitchen appliances is available in the store.
When you visit them, do you go there to shop for everything you need to decorate a new home? No.
You visit the store only when something in your house breaks or you need to buy a new item. So, you’re stepping into the shop with a specific goal in mind.
It’s the same for almost all visitors to your website. People who visit your online shop or blog already know what they want. And your growth directly correlates to how easily they can complete this desired action.
Here are a few known benefits of having a search form on your website:
- Increases Store Sales: Integrating a search form can directly increase sales by enabling visitors to locate and purchase products quickly. By reducing friction, search forms hugely influence buying decisions.
- Enhances User Experience: A search form simplifies how visitors can find content, products, or information on a website. Removing the need to navigate pages individually enhances the overall user experience. This efficiency can lead to longer visits and more interactions on the site.
- Boosts User Engagement: Search forms help visitors quickly find the content they’re interested in. This ease of access encourages users to engage more deeply, whether by reading articles, browsing products, or signing up for services, all of which improve engagement.
- Increases Conversion Rates: A straightforward search tool lets users find what they need, reducing decision-making time and quickly increasing accessibility. This can lead to a higher likelihood of purchase or other key actions, thus boosting conversion rates.
- Helps Gather Insights: Information from search queries provides valuable insights into user preferences and behaviors. These insights can inform content creation, product offerings, and strategic planning, ultimately influencing the website’s development and marketing strategies.
So, let’s see how to create a custom search form in WordPress with only 3 easy steps.
How to Create a Custom Search Form in WordPress
The easiest way to create a custom form in WordPress is by using the SearchWP plugin.

It is a complete search solution for WordPress that provides an incredibly powerful search engine for internal search and works as a no-code search form builder.
With this plugin, you can make almost anything on your site searchable. You’ll also be able to have multiple search engines, set custom search rules, view search statistics, and much more!
Over 50,000 WordPress site owners worldwide actively use it to stay ahead of their competitors and provide their audiences with the best search experience for their users.
Here are some other things you can do with SearchWP:
- Display live search results: Would you like to show search results on your site as the users type? SearchWP provides this and many other features with its many useful extensions.
- On-site search activity tracking: Do you want to see what visitors are looking for? SearchWP lets you track all searches, enabling you to understand your audience’s needs better.
- Prioritize search results: Want to bring a particular page or item to the top of your site’s search results? With SearchWP, you can customize the order of search results with just a few clicks.
- Make documents and PDFs searchable: Do you have PDFs and office documents on your site? SearchWP can make them searchable and provide better search results.
- Built-In Voice Search: Add a microphone button to your search form so visitors can speak their queries. Voice search is built directly into SearchWP and works in Chrome, Edge, and Safari.
Now, let’s proceed to the step-by-step guide on how to create a custom search form in WordPress using SearchWP, the no-code search form builder for WordPress.
Step 1: Install & Activate The SearchWP Plugin
To get started, visit the SearchWP website and sign up for a new account. Choose the plan that fits your site and complete your purchase.
Once you’ve signed up, log in to your account and head to the Downloads tab.
Next, you can click Download SearchWP to save the ZIP file to your computer, then copy your license key from the same page.

Once that’s done, upload the plugin files to your website and install the plugin. You can follow this guide on installing WordPress plugins if you need a step-by-step walkthrough.
A welcome screen will appear after activation. Go ahead and click Start Onboarding Wizard and follow the onscreen steps to enter your license key and configure your first search engine.

SearchWP is all set! You’re ready to create your first custom search form.
Step 2: Create A Custom Search Form In WordPress
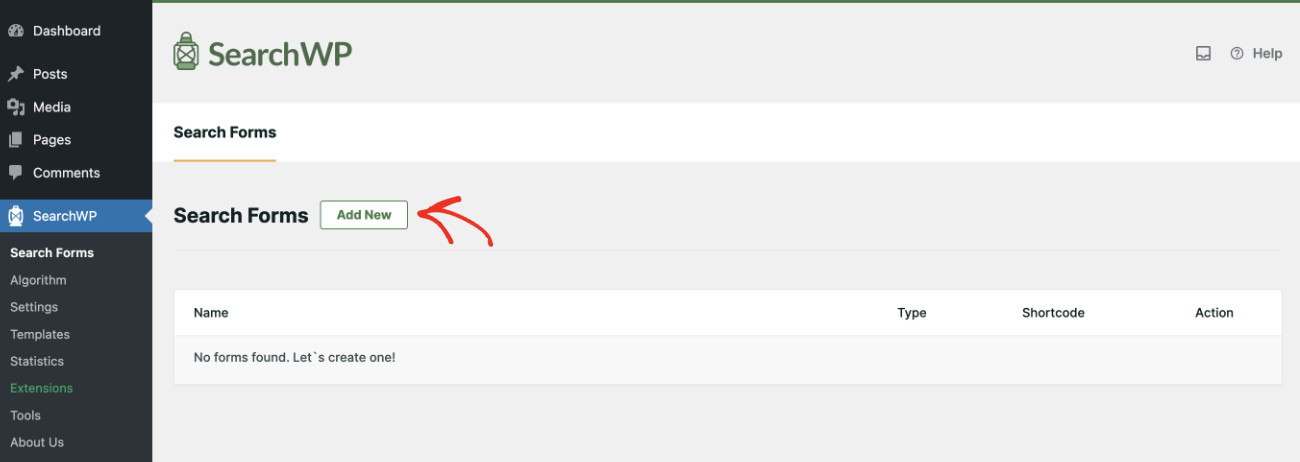
To create a custom search form, visit SearchWP » Search Forms from the WordPress dashboard and then click the “Add New” button.
Next, give your form a clear name so you can identify it later.
SearchWP shows you five pre-built visual themes to choose from. Select the one that best matches your site’s look.

After that, you can define which engine this search form will use, as SearchWP lets you set up multiple Engines to index/serve different content.
Also, you can use the SearchWP Results Page if you want to optimize the WordPress search results page.

You can easily configure your search form as you see fit.
For detailed instructions on making advanced customizations, please see our guide on how to create an advanced search form in WordPress.

Finally, you can also customize the search form design according to your website theme.
You’ll have different controls for changing the color and size of both the search form and the button styles.

Once you’re satisfied with the settings, scroll to the top.
From here, click Save to store the form.

Step 3: Display Your Custom Search Form
Now that you have created your first custom search form in WordPress, you can display it anywhere on your website. There are a few ways to add search forms to your website.
Simply click Embed right next to the Save button to get instructions.

SearchWP lets you display a search form in 3 ways.
You are free to choose your desired method.
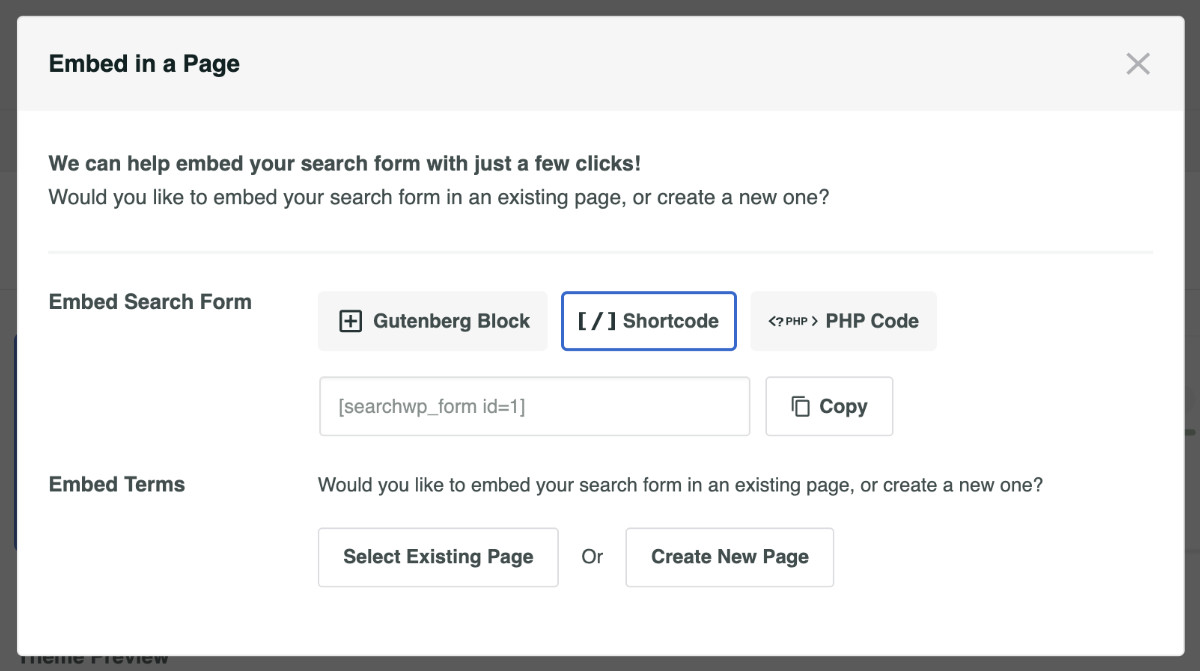
For this tutorial, let’s see how you can display your custom search form using the Gutenberg Block.
To do that, open the post or page where you want to show the search form in Edit mode. Then, find your desired location in the content editor and click the “+” button.

Next, look for the SearchWP Form block and select it.
Then you’ll need to choose the form you created to display on this location from the “Select a Form” dropdown.

Once you’re done, go ahead and click “Save” or “Publish,” depending on your case, to make the search form available to your visitors.
Now, visit the front end of your website to see the search form displayed in your desired location.
Congratulations! You’ve just learned how to create a custom search form in WordPress and publish it in your desired location.
Bonus: Add Live Search to Your Custom Form
Your custom form sends visitors to a results page when they submit their search.
You can upgrade that experience by adding live autocomplete search so results appear in a dropdown as visitors type.

SearchWP’s Live Search extension (listed in the Extensions tab as Live Search) works automatically with any form you’ve created.
Install it from SearchWP » Extensions and your forms will start showing live results immediately, with no additional configuration needed.
FAQs About Custom Search Forms
1. Can I create multiple custom search forms in WordPress?
Yes, SearchWP lets you create as many forms as your site needs. Navigate to SearchWP » Search Forms and click Add New for each new form. You can assign different forms to different search engines, so a form on your blog searches posts while a form in your shop searches products and custom fields.
2. Does a custom search form replace the default WordPress search bar?
Yes. When SearchWP is active, it takes over the default WordPress search across your site. Any form you create in SearchWP » Search Forms uses SearchWP’s relevance engine, which scores matches against your full index (including custom fields, taxonomies, and PDFs) instead of relying on the limited title/excerpt/content matching that WordPress runs natively.
3. Can I add a custom search form to my WordPress navigation menu?
Yes. Copy the shortcode for your form from the Embed panel inside SearchWP » Search Forms. You can paste it into a Text widget in a header widget area, or use the SearchWP Form element inside your page builder to place it directly in the navigation area.
4. Can I add voice search to my WordPress search form?
Yes. SearchWP includes a built-in voice search feature you can enable per form. Open your form in SearchWP » Search Forms, scroll to Custom Styling, and toggle on Voice Search. A microphone button will appear on the form, and visitors on Chrome, Edge, or Safari can use it to search by speaking.
5. Do I need coding skills to create a custom search form in WordPress?
No. SearchWP’s form builder is entirely visual. You can configure the design, connect it to a search engine, and embed it on any page using a Gutenberg block, shortcode, or PHP code.
You now have a custom search form running on your WordPress site, styled to fit your brand and connected to a real search engine that returns relevant results for your visitors.
We hope this article helped you learn how to create a custom search form in WordPress. You may also want to see our guides on how to customize the WordPress search results page and how to make your WordPress blog more searchable.
Get SearchWP today to provide the best experience for your customers and stay ahead of your competitors!


