Would you like to know how to track searches on your WordPress site?
That’s a great way to find out what kind of content your audience is looking for so you can provide them with it.
In this article, we’ll show you 2 methods to track your WordPress site search activity.
Why Track Searches on Your Site?
If you want to ensure the best user experience for your site visitors, it’s crucial to examine their needs.
One of the best ways to do so is to start collecting data about searches they make on your site.
Analyzing the visitors’ search behavior lets you know the way they search and what they’re looking for.
That’s precious information that you can use in different cases:
- Get new content ideas. Gathered search data is a great source of fresh content ideas. Analyze it to get in touch with your audience and provide them with the content they want.
- Figure out what’s missing from your site. See a lot of search queries related to a certain topic but don’t have content dedicated to it? It’s a missed opportunity to get more traffic.
- Restructure and update your content. Search data tracking allows you to take a look at your site content from a different angle and restructure it if needed.
- Get to know your audience better. There are not so many opportunities for website owners to get in touch with their audience. Tracking on-site searches is one of the best ways to better understand your audience’s needs.
Now let’s talk about how you can start collecting data about search activity on your WordPress site.
How to Track Searches on Your WordPress Site
There are several ways to track search queries on a WordPress site. In this article, we’ll show you the 2 best ones.
Method 1: Using the SearchWP Plugin
The easiest way to track searches on your WordPress site is to use a plugin like SearchWP.
As the best WordPress search plugin, SearchWP drastically expands the capabilities of the native WordPress search engine.
Here are just some of the useful things you can do with SearchWP:
- Searchable custom fields. The default WordPress search engine doesn’t consider data inside the custom fields. SearchWP allows you to fix this issue and make custom fields searchable.
- PDF and office document indexing. The native WordPress search engine completely ignores the text inside uploaded documents. With SearchWP, you can include documents into the search results in a few clicks.
- Live search results. SearchWP comes with plenty of useful extensions, and one of them allows you to display search results on your site in live mode. It eases your website navigation and ensures a better user experience for your visitors.
- Automatic theme integration. You don’t have to take any additional steps after installing SearchWP, as it integrates to your current site search form and search results template.
Now, let’s see how you can use SearchWP to track searches on your WordPress site.
Step 1: Install and Activate SearchWP
You can start by getting your copy of SearchWP here.
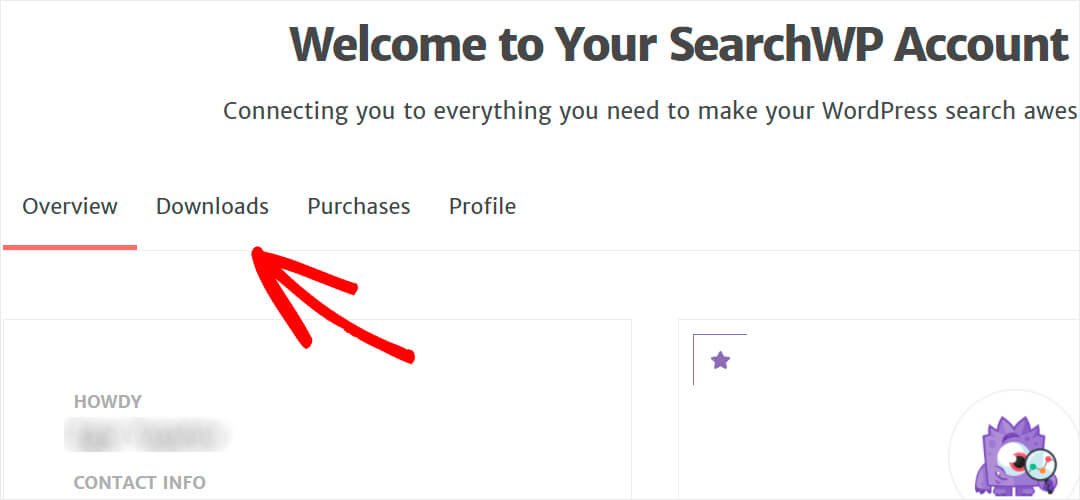
When you’re done, go to the Downloads tab in your SearchWP account.
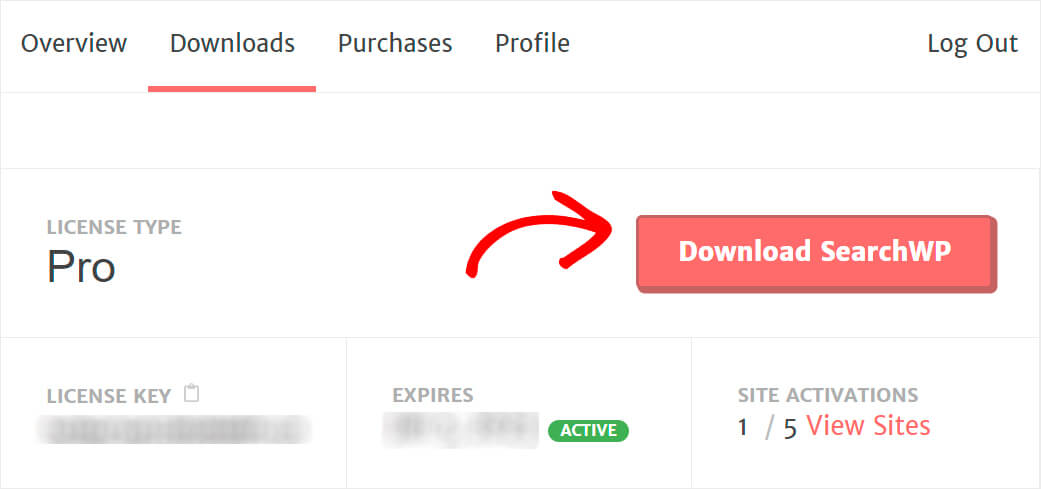
Then, click Download SearchWP to save the plugin to your computer.
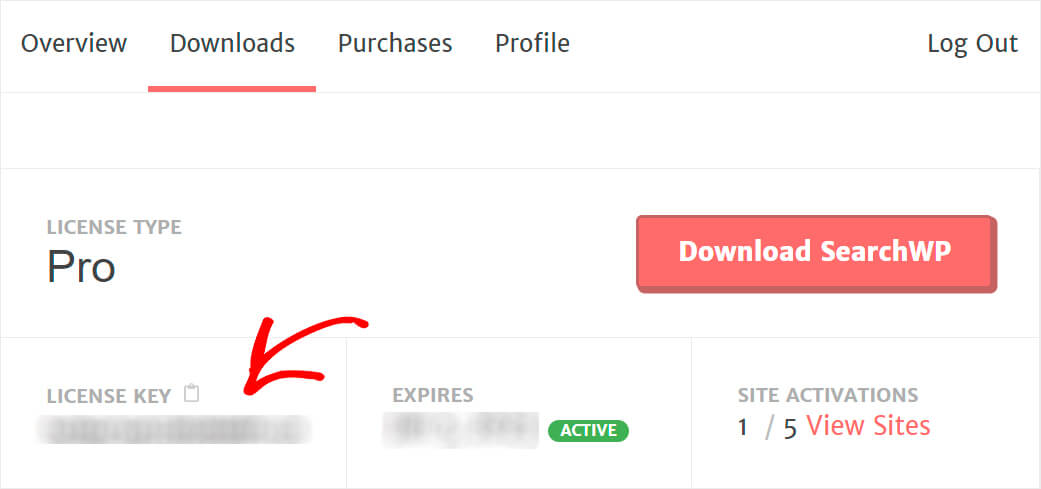
After the download has started, copy your license key, as you’ll need it soon to activate the plugin.
Then, go over to your WordPress dashboard and upload the SearchWP plugin ZIP file.
Need help with that? Kindly check out this step-by-step guide on how to install a WordPress plugin.
Once you’ve installed and activated SearchWP, the next step is to enter your license key.
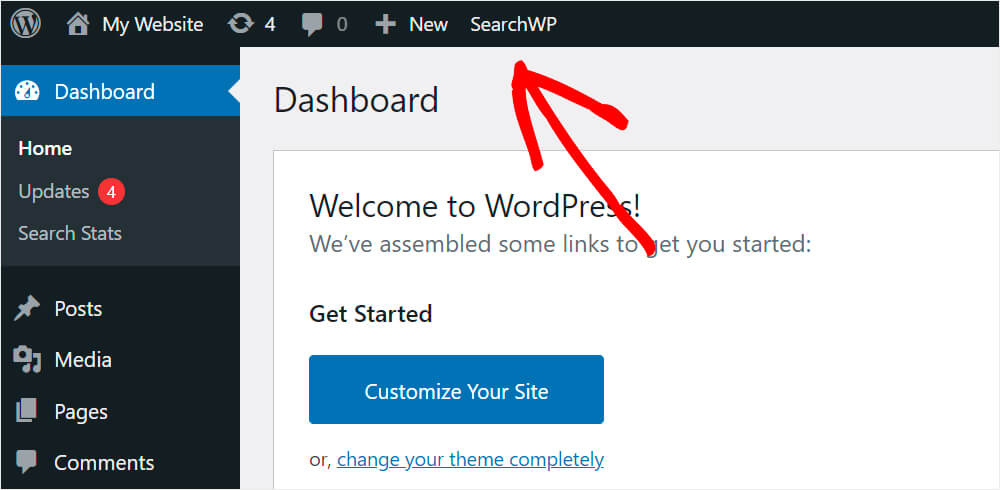
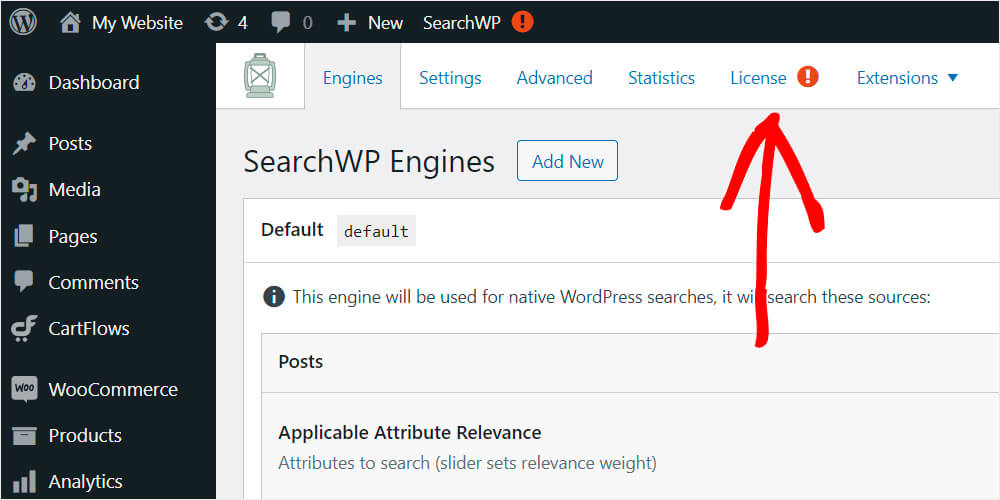
Click the SearchWP button that appears at the top of your WordPress dashboard to get to the plugin settings.
Then, go to the License tab.
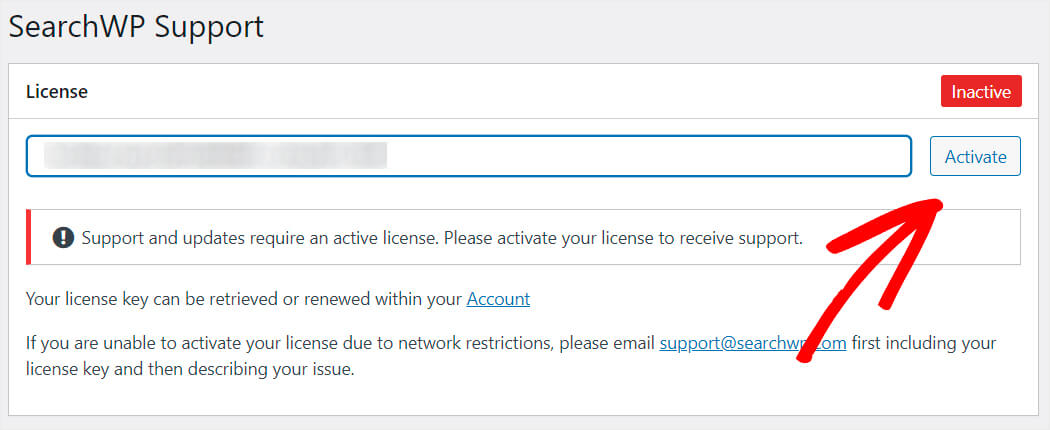
Paste your SearchWP license key to the appropriate field and click Activate.
Once you get your copy of SearchWP activated, the next step is to download the Metrics extension.
Step 2: Install and Activate the Metrics Extension
Even though SearchWP gathers search data by default, using the Metrics extension lets you get advanced information about your users’ search behavior.
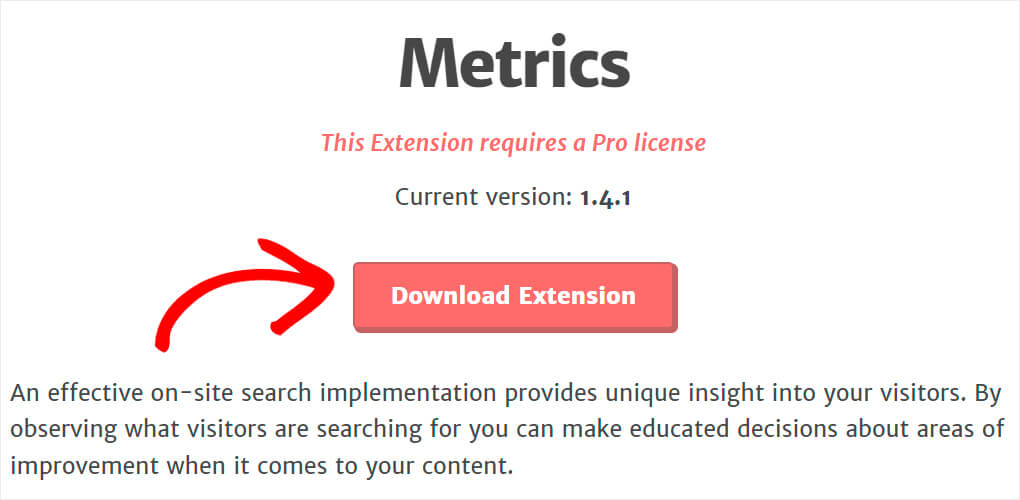
To grab it, go to the Metrics extension download page in your SearchWP account dashboard and press Download Extension.
Then install and activate the extension in the same way as the SearchWP plugin.
Step 3: Check Out Your Site Search Terms Data
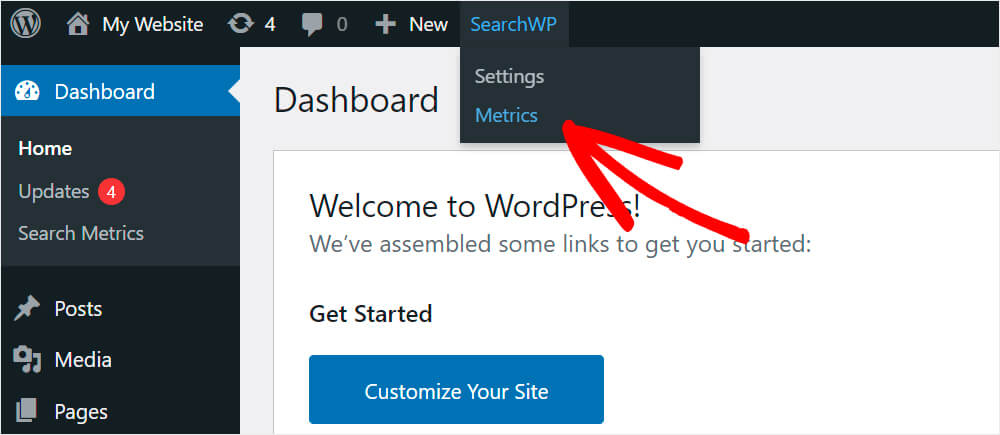
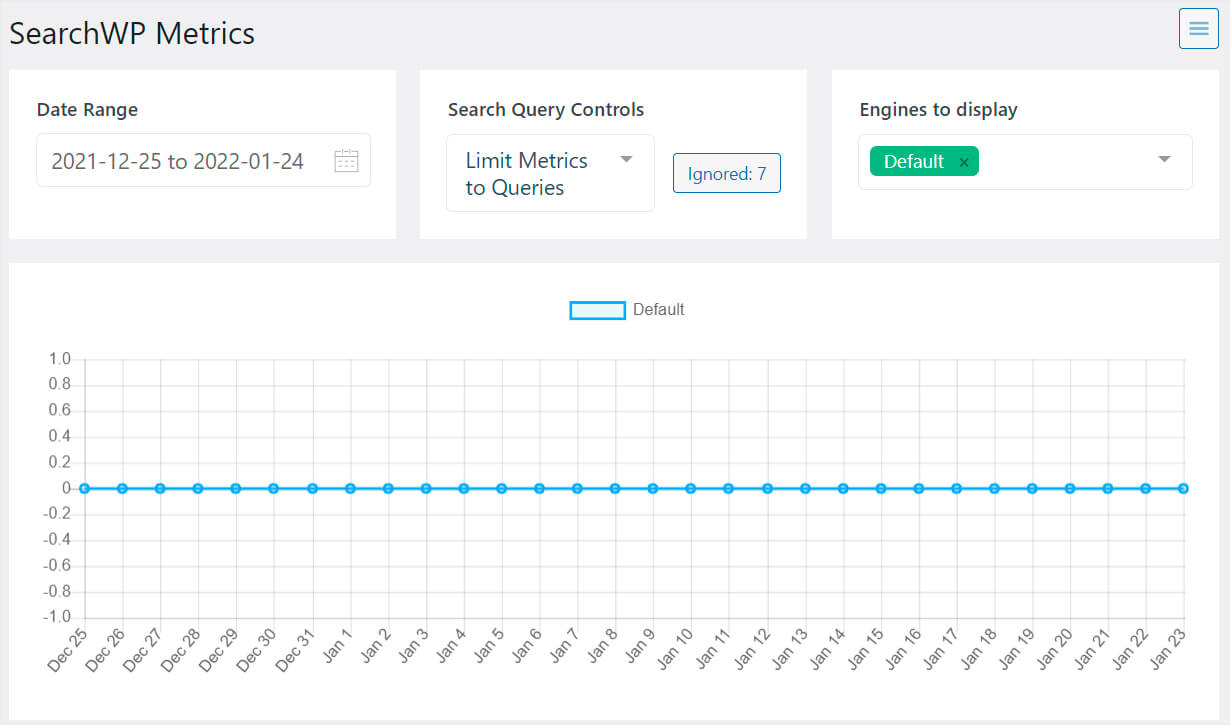
Once done, go to your WordPress dashboard and click Metrics under SearchWP at the top bar.
On this tab, you can find all the data about searches made by your visitors.
There is no data right now because you just installed the plugin. But starting today, all searches made on your site will appear here.
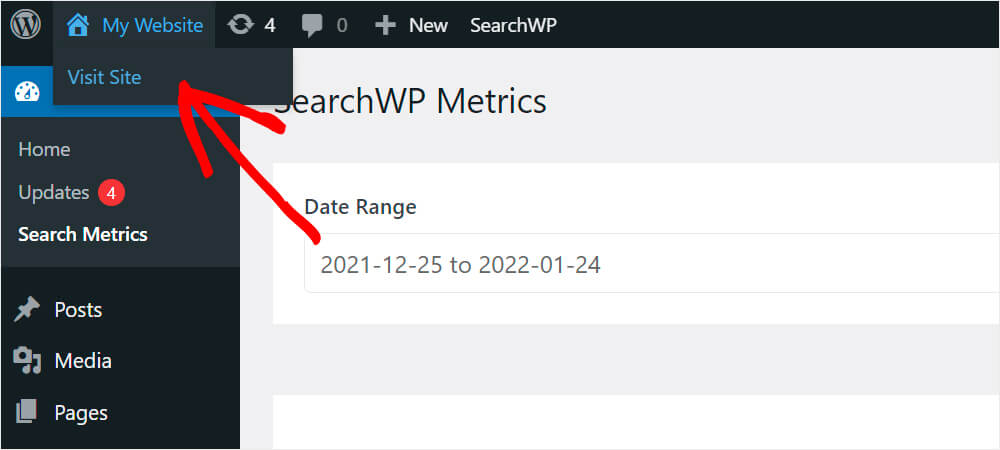
Let’s check if the plugin works. Go to your website by clicking the Visit Site button under your site’s name.
Do a search for a phrase or keyword. For example, we’ll search for “how to install a WordPress theme.”
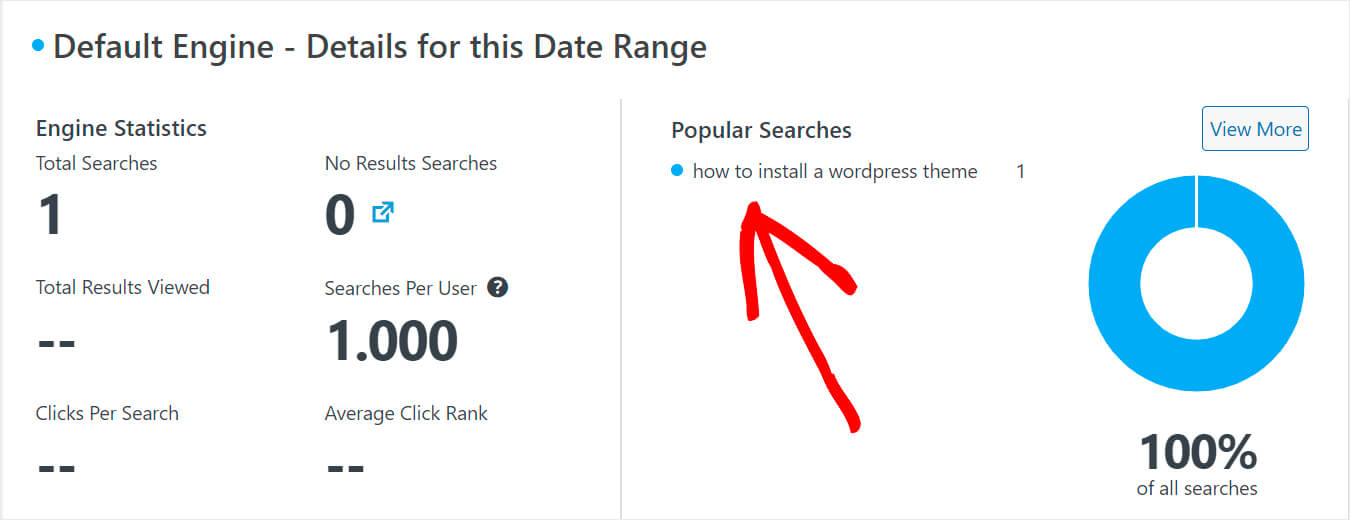
Now let’s go back to the Metrics plugin tab and see if our search query appears there.
As you can see, our search term has been successfully tracked. Now you can start gathering data about search activity on your site.
Method 2: Using the MonsterInsights Plugin
You can also track searches on your WordPress site using the MonsterInsights plugin.
Normally, you can track searches by connecting Google Analytics to your site. But it’s tricky to do for newbies since it requires making changes to the theme code.
MonsteInsights allows you to connect your site with Google Analytics in just a couple of clicks.
Besides, this powerful and user-friendly WordPress analytics plugin has a set of unique features that set it apart from others.
Here are just some of them:
- Real-time analytics. Using MonsterInsights, you can track everything that’s happening on your site in live mode. Collecting and analyzing data about your visitor behavior allows you to improve your site’s performance and adjust your marketing strategy.
- eCommerce tracking. MonsterInsights has seamless integrations with all popular WordPress eCommerce plugins and provides you with the most comprehensive reports. Using this plugin, you can track such vital metrics as total revenue, conversion rate, average order value, and many more right in the WordPress dashboard.
- Enhanced Link Attribution. Would you like to know which links on your site are the most clickable? MonsterInsights allows you to measure that and find out what your visitors are most interested in.
Now let’s take a look at how you can track searches on your WordPress site using MonsterInsights.
Step 1: Install and Activate MonsterInsights
The first step is to grab your copy of the MonsterInsights plugin here.
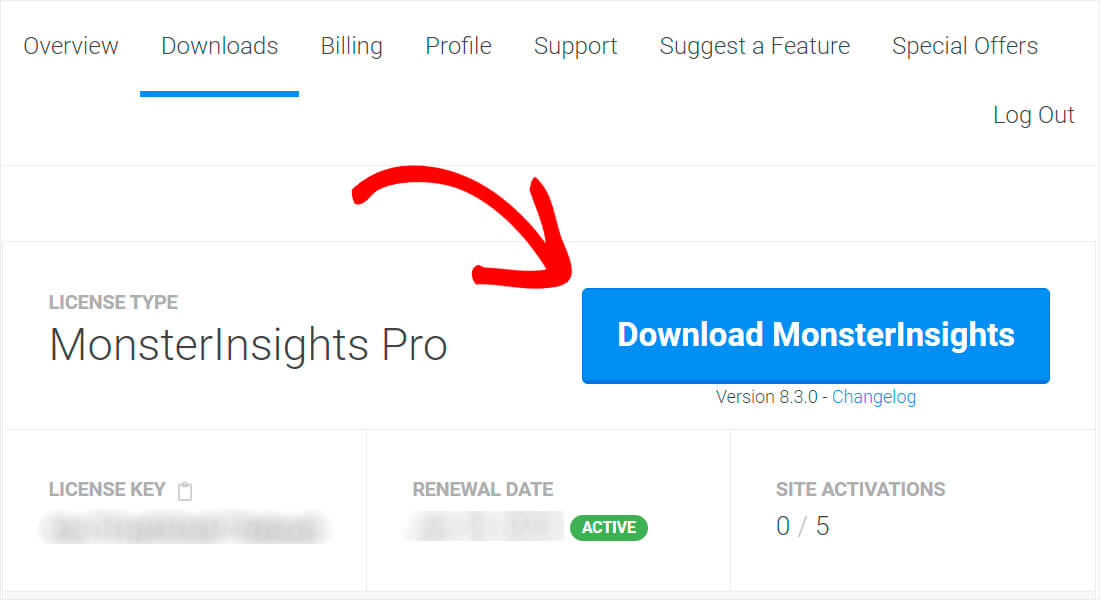
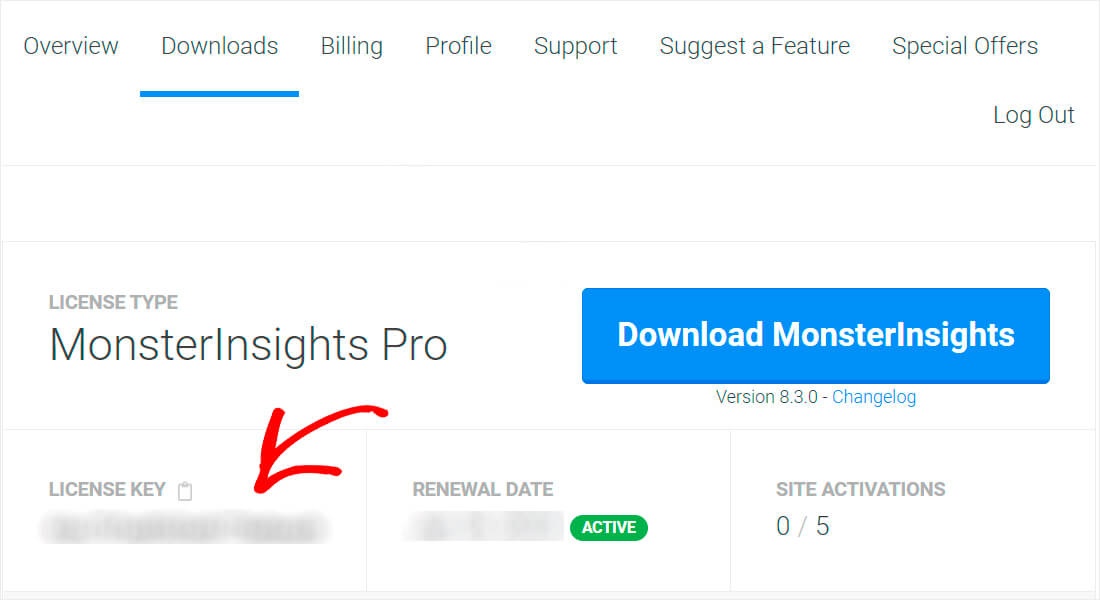
Once done, go to your MonsterInsights account and go over to the Downloads tab.
Then, press the Download MonsterInsights button and save the plugin to your computer.
Copy your plugin license key on the same tab as you’ll need it further to activate the plugin.
Once the download is complete, go to your WordPress site dashboard and upload the MonsterInsights plugin ZIP file.
Need a refresher on how to do that? Check out this step-by-step guide on how to install a WordPress plugin.
Once you installed and activated MonsterInsights, the next step is to connect your site with Google Analytics.
Step 2: Add Google Analytics to Your Site
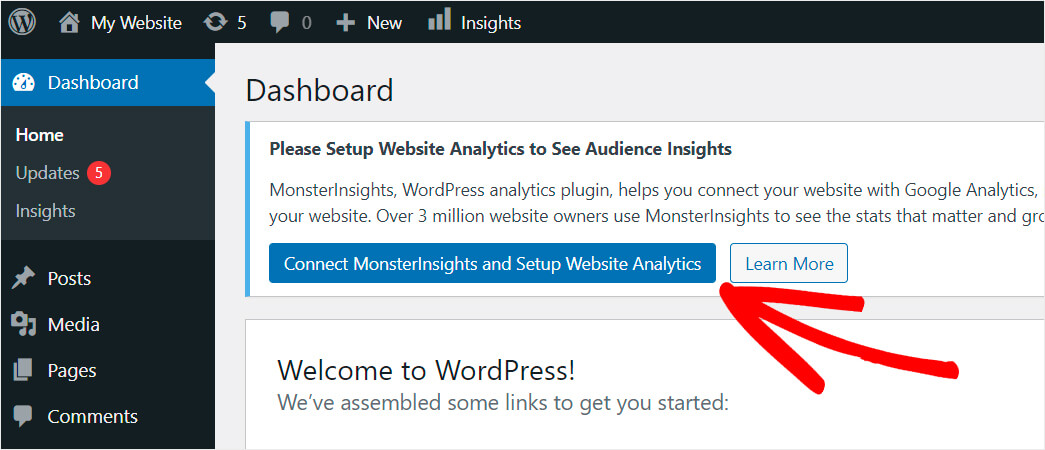
Go to your WordPress dashboard and click the Connect MonsterInsights and Setup Website Analytics button.
Then simply follow the steps of the setup wizard to easily add Google Analytics to your site.
Step 3: Customize the Google Analytics Settings
Once you’ve connected Google Analytics with your site, the next step is to customize the Google Analytics settings.
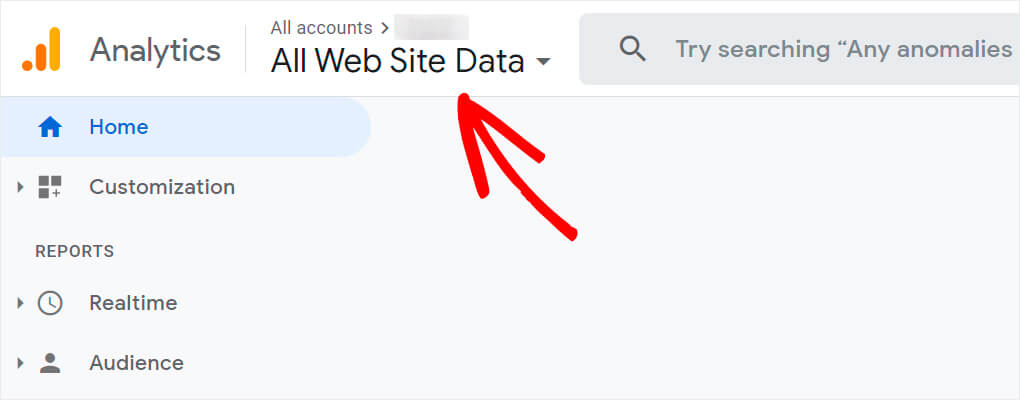
Go to your Google Analytics account and click All Web Site Data at the top left.
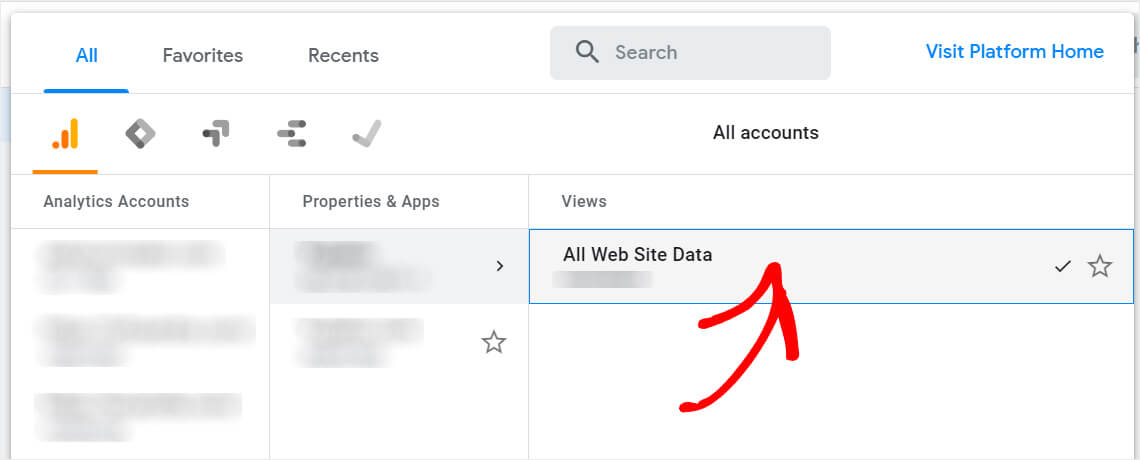
Select the site you’ve just added and on which you want to turn on the search tracking.
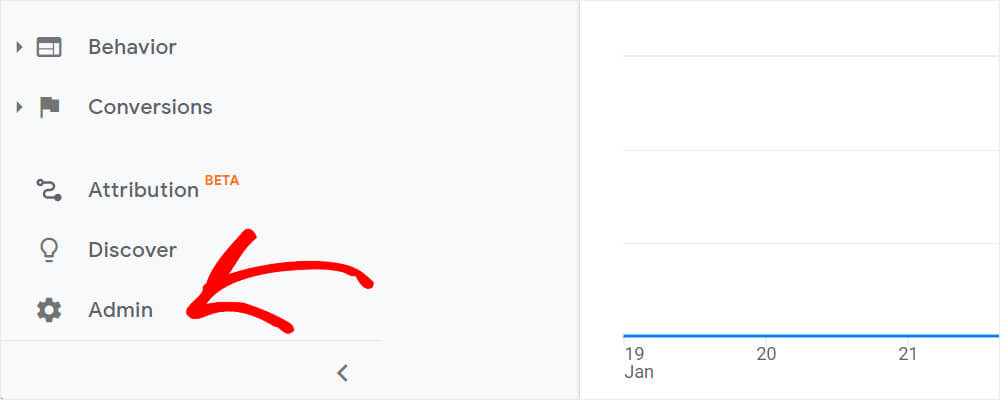
Then, click Admin at the bottom left.
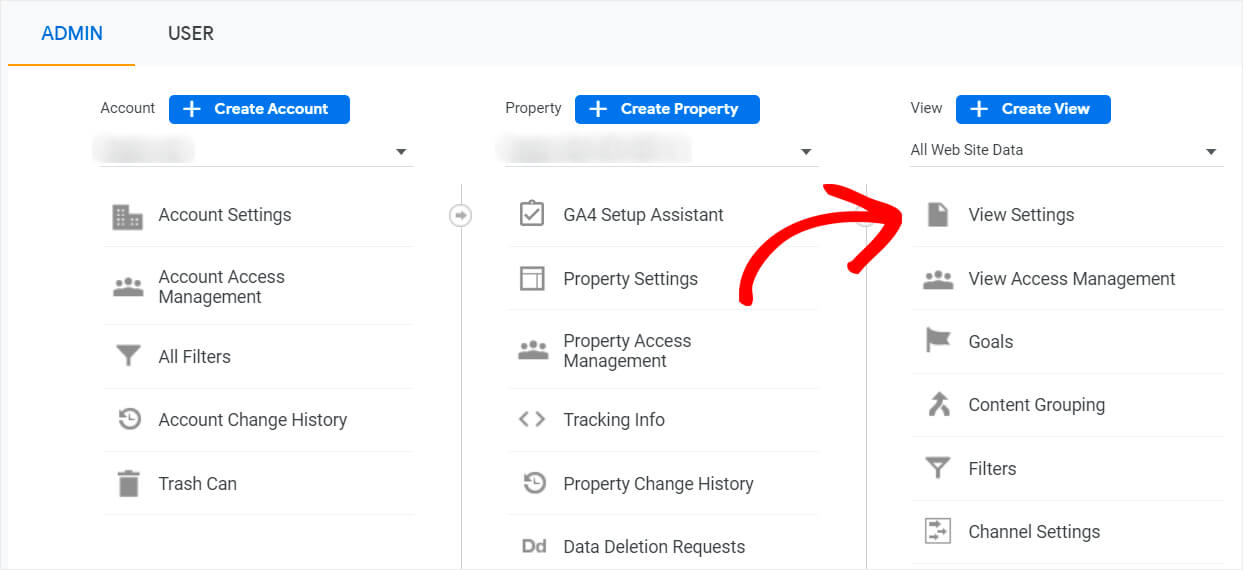
Next, click View Settings under the View column.
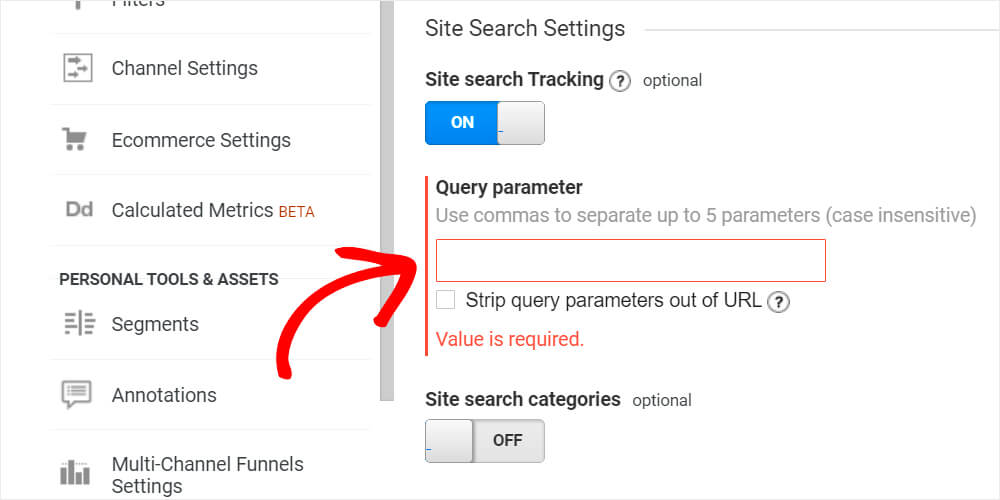
Scroll down to the Site Search Settings heading and turn on the Site search Tracking toggle.
After that, the Query parameter field will appear.
Enter in this field the letter that displays in the URL of your site before the search term.
By default, the search term URL in WordPress looks like this: https://www.your site.com/?s=how+to+install+a+new+theme
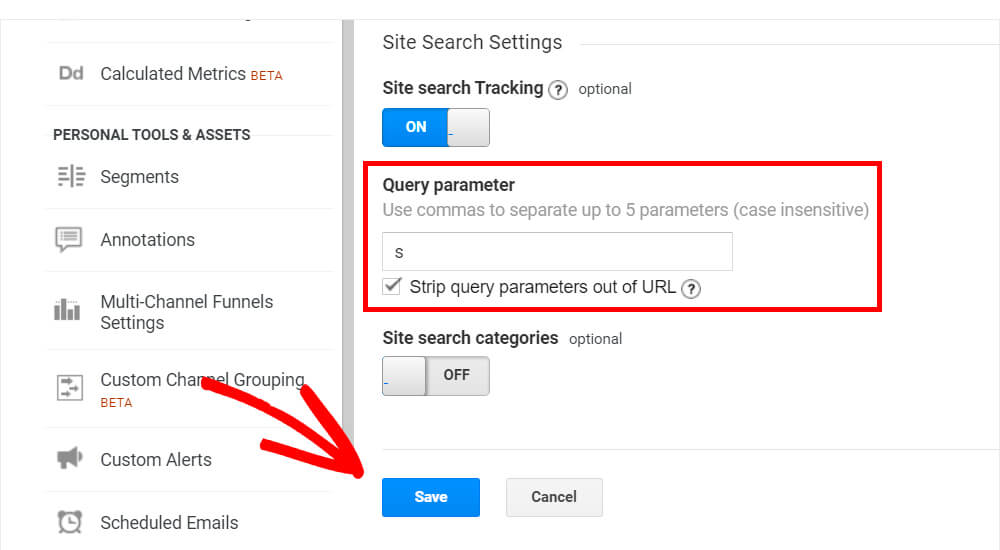
As you can see, there is the S letter before the search term. So enter it into the Query parameter field.
Step 4: Check the “Strip query parameter out of URL” box
Also, make sure that you checked the Strip query parameter out of URL box. It’ll make it easier to track total search volume in other types of reports.
Once done, press Save.
That’s it. You’ve successfully set up Google Analytics to start tracking search queries on your WordPress site.
Step 5: See Your Site Search Terms Data in Google Analytics
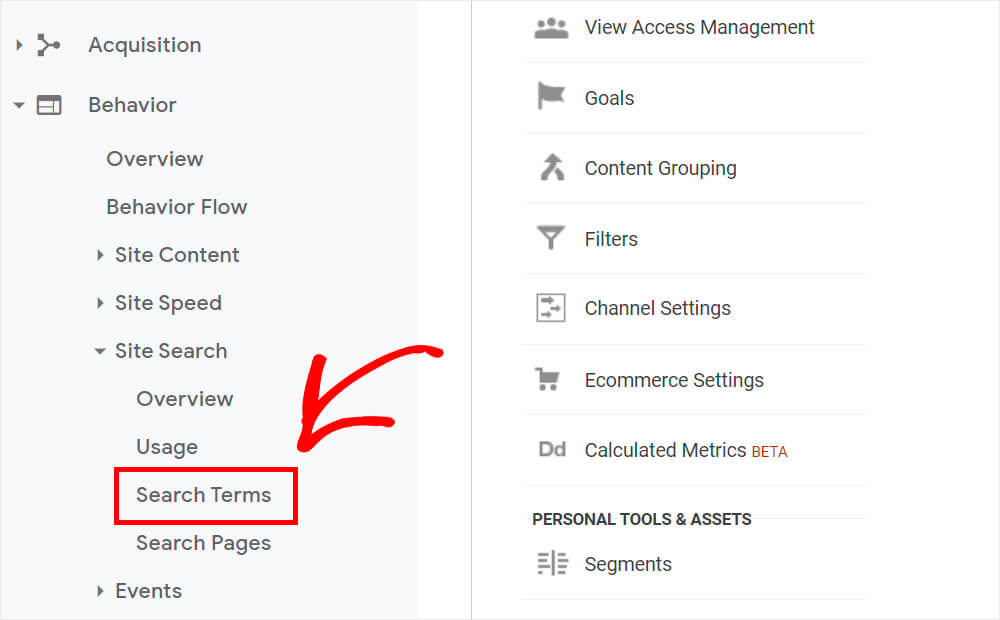
To see the searches visitors entered on your site, go to Behavior » Site Search » Search Terms at the left panel.
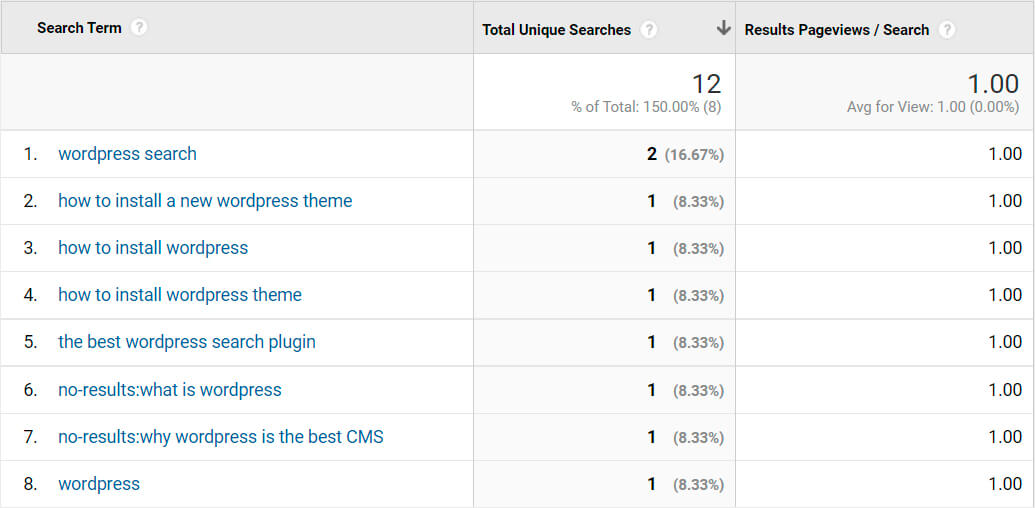
Here, you’ll find all the data about search terms on your site.
Please note that if no results were found for a particular query, it would be displayed with the no-results: prefix.
So, in this article, you learned 2 simple ways to track searches on your WordPress site.
If you’re ready to start tracking search queries on your site and prefer the first method, you can grab your copy of SearchWP here.
If the second method suits you better, you can grab your copy of MonsterInsights here.
Run a WordPress eCommerce store? It might be helpful to learn how to restrict WooCommerce product search to title only in just a few clicks.
Also, you might be interested in how to add WordPress search by category if you have a lot of different content.

