


Imagina que un cliente llega a tu tienda WooCommerce buscando un jersey azul de lana merino. Escribe “lana merino azul” en la barra de búsqueda y obtiene cero resultados, a pesar de que tienes exactamente lo que necesita.
Esa es la búsqueda predeterminada de WooCommerce en acción, y hemos visto que cuesta a los propietarios de tiendas ventas reales cada día.
El problema es que la búsqueda predeterminada de WooCommerce solo compara palabras clave con los títulos de los productos y el contenido básico. Ignora por completo los atributos del producto, las variaciones, las etiquetas, las categorías y los campos personalizados almacenados en tu base de datos.
Añadir un widget de búsqueda personalizado de WooCommerce es cómo solucionas eso. Puedes colocar un formulario de búsqueda debidamente configurado en tu barra lateral, encabezado, página de tienda o en cualquier otro lugar de tu sitio, y conectarlo a un motor de búsqueda que realmente entienda tus productos.
En este artículo, te mostraremos cómo añadir widgets de búsqueda personalizados de WooCommerce a tu tienda paso a paso, sin escribir una sola línea de código.
¿Qué son los widgets de búsqueda personalizados de WooCommerce?
Un widget de búsqueda personalizado de WooCommerce es un formulario de búsqueda que colocas en cualquier lugar de tu sitio y conectas a un motor de búsqueda configurado. A diferencia de la barra de búsqueda predeterminada, te da control sobre qué busca el motor, cómo se clasifican los resultados y dónde aparece el formulario.
Los temas clásicos de WordPress utilizan la pantalla de Widgets para colocar formularios de búsqueda en áreas como la barra lateral, el encabezado o el pie de página. Los temas FSE (edición completa del sitio) basados en bloques utilizan el editor de bloques en su lugar, donde puedes colocar un bloque de formulario de búsqueda en cualquier plantilla o página.
De cualquier manera, el widget en sí es solo la visualización del front-end. La verdadera mejora proviene de lo que lo impulsa.
¿Por qué añadir widgets de búsqueda personalizados de WooCommerce?
Un widget de búsqueda bien ubicado convierte la navegación de tu tienda en un camino directo a la compra. Esto es lo que ganas al reemplazar la experiencia predeterminada:
- Mejor descubribilidad de productos. La búsqueda predeterminada omite productos almacenados con atributos personalizados como color, tamaño, SKU o material. Un widget personalizado respaldado por un motor de búsqueda real encuentra productos sin importar por qué atributo busque el cliente.
- Más ventas del tráfico existente. Los visitantes que utilizan la búsqueda en el sitio convierten a tasas significativamente más altas que los que navegan. Cada vez que una búsqueda devuelve cero resultados, pierdes una conversión por la que ya pagaste para atraer.
- Control sobre qué se busca. Con un widget personalizado, decides exactamente qué datos del producto lee el motor de búsqueda: título, descripción, etiquetas, variaciones, campos personalizados o cualquier combinación. Incluso puedes crear diferentes widgets de búsqueda para diferentes páginas, cada uno ajustado para un propósito diferente.
- Análisis de búsqueda. Una vez que la búsqueda esté funcionando, puedes rastrear exactamente qué buscan los clientes y qué consultas devuelven cero resultados. Nuestra guía sobre cómo encontrar el producto más buscado en tu sitio web detalla esto.
- Una experiencia limpia y profesional. Una barra de búsqueda que devuelve resultados relevantes al instante genera confianza. Hemos trabajado con muchos propietarios de tiendas que notaron una caída directa en la tasa de rebote después de arreglar la búsqueda de sus productos.
La buena noticia es que configurar todo esto lleva unos diez minutos con el plugin adecuado.
A continuación, te mostramos cómo añadir widgets de búsqueda personalizados de WooCommerce a tu sitio web.
Cómo añadir widgets de búsqueda personalizados de WooCommerce (Fácilmente)
La forma más fácil de añadir un widget de búsqueda personalizado a WooCommerce es usar un plugin, y SearchWP es el mejor plugin de búsqueda de WordPress para esta tarea.

SearchWP es el mejor plugin de búsqueda de WooCommerce, en el que confían más de 50.000 propietarios de sitios web para reemplazar la búsqueda predeterminada de WordPress con un motor rápido y preciso.
Crea un índice de búsqueda en el contenido de tu sitio, publicaciones, páginas, productos, medios, campos personalizados y más. Y te permite controlar exactamente qué se busca, cómo se clasifican los resultados y dónde aparecen los formularios de búsqueda.
Estas son las características clave que lo hacen ideal para tiendas WooCommerce:
- Integración con WooCommerce. La extensión dedicada de WooCommerce de SearchWP potencia la búsqueda de tus productos con un motor de relevancia real. Respeta las reglas de visibilidad del producto, gestiona la clasificación del catálogo y hace que los atributos, variaciones y etiquetas de los productos sean completamente buscables.
- Motores de búsqueda personalizados. Crea múltiples motores y conecta cada uno a un formulario de búsqueda diferente. Puedes ejecutar una búsqueda solo de productos en la barra lateral de la tienda y una búsqueda en todo el sitio en el encabezado al mismo tiempo.
- Análisis de búsqueda. La extensión Metrics te muestra exactamente qué buscan tus clientes, qué búsquedas no devuelven resultados y dónde estás perdiendo ventas por tu propia barra de búsqueda.
- Múltiples opciones de ubicación. Agrega formularios de búsqueda como widgets, bloques de Gutenberg, shortcodes o elementos de constructor de páginas, sin restricciones de tema.
- Indexación de documentos PDF y de oficina. Si vendes libros u otros recursos basados en texto, tus usuarios podrán encontrarlos más fácilmente. SearchWP considera el contenido de los archivos de documentos en tu biblioteca de medios al buscar.
- Estadísticas y perspectivas de los visitantes. Puedes ver qué buscan tus visitantes. Puedes usar esta información para mejorar tus servicios.
Con eso, veamos cómo agregar widgets de búsqueda personalizados de WooCommerce a tu sitio usando SearchWP.
Paso 1: Instalar y activar SearchWP
Para empezar, puedes visitar el sitio web de SearchWP y registrarte para obtener una nueva cuenta.
Una vez que hayas creado una cuenta y estés en tu panel de cuenta, ve a la pestaña Descargas. Desde allí, haz clic en Descargar SearchWP para guardar el archivo ZIP del plugin en tu computadora. Copia la clave de licencia en la misma página, ya que la necesitarás durante la configuración.

A continuación, puedes subir los archivos del plugin y luego instalar y activar SearchWP en tu sitio de WordPress.
Si necesitas ayuda, consulta esta guía para principiantes sobre cómo instalar un plugin de WordPress.
Después de la activación, verás la pantalla de bienvenida de SearchWP con un asistente de configuración. Haz clic en Iniciar asistente de incorporación y sigue las instrucciones en pantalla, incluyendo la introducción de tu clave de licencia cuando se te solicite.

Genial, SearchWP está ahora instalado y listo para configurar. El siguiente paso es agregar soporte para WooCommerce.
Paso 2: Instalar la Extensión WooCommerce Integration
SearchWP tiene una extensión dedicada de Integración de WooCommerce que potencia la búsqueda de sus productos con un motor de relevancia completo.
Maneja las reglas de visibilidad de productos, la clasificación del catálogo y asegura que SearchWP lea correctamente los datos de sus productos.
Para instalarla, simplemente navega a SearchWP » Extensiones desde tu panel de WordPress.

A continuación, busque la extensión Integración de WooCommerce en la lista y haga clic en Instalar.
Se activa automáticamente en unos segundos.
Ahora SearchWP tiene acceso completo a sus productos y datos de productos de WooCommerce. A continuación, vamos a configurar el motor de búsqueda.
Paso 3: Configurar un Motor de Búsqueda Personalizado de SearchWP
SearchWP utiliza motores de búsqueda, que le permiten configurar ajustes que controlan qué se busca y cómo se clasifican los resultados.
Puede crear varios motores y conectar cada uno a un formulario de búsqueda diferente en su sitio.
Para personalizar su motor de SearchWP, navegue a SearchWP » Algoritmo desde el panel de WordPress.
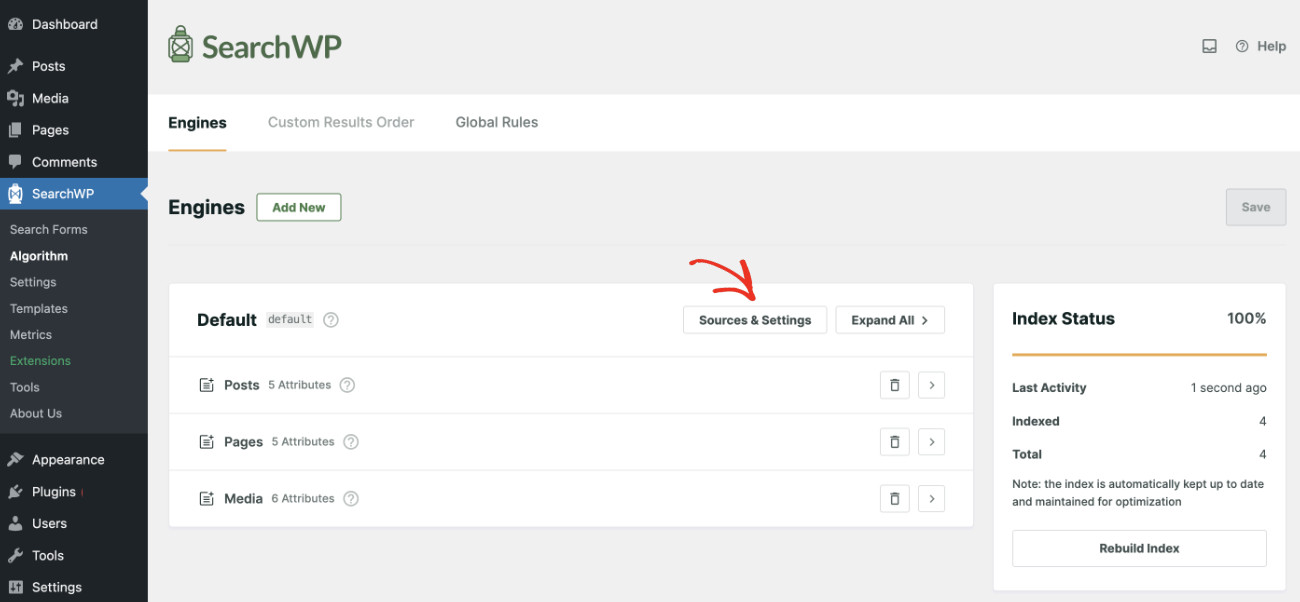
Desde allí, haga clic en Fuentes y configuración. Aparecerá una ventana emergente con una lista de fuentes para elegir.
Luego, marque la casilla junto a Productos para que sus productos de WooCommerce sean buscables. También puede incluir otras fuentes predeterminadas como Entradas, Páginas o Medios si desea que el widget busque en todo su sitio.
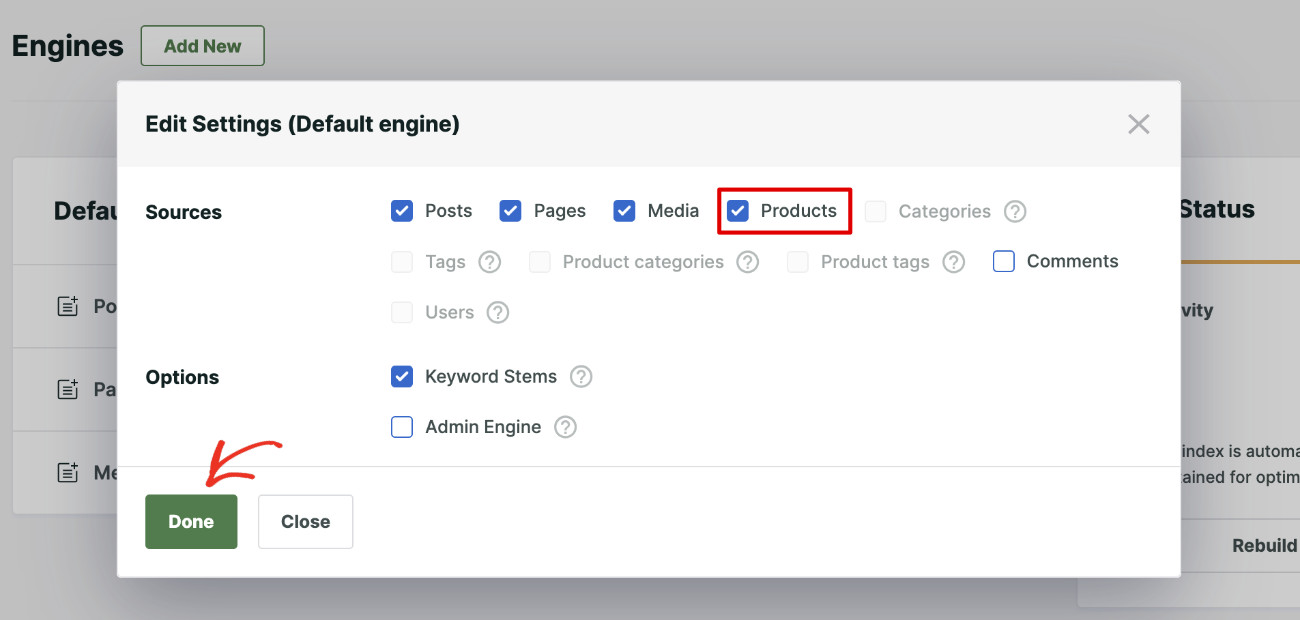
Haga clic en Hecho cuando haya terminado.
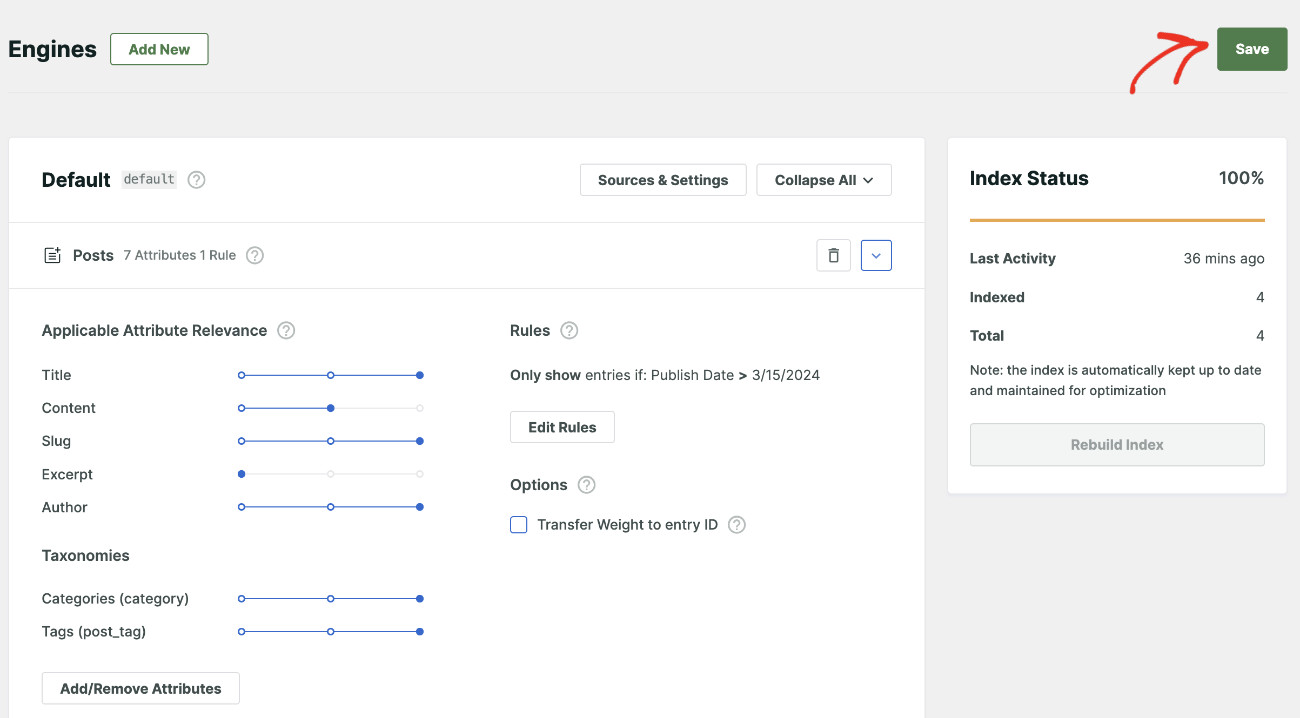
Ahora desplácese hacia abajo hasta la sección Productos para ajustar qué lee SearchWP de cada producto.
Para empezar, haga clic en Añadir/Eliminar atributos para abrir el panel de atributos. Aquí puede añadir campos personalizados de productos (como SKU, color o tamaño) y taxonomías (como etiquetas y categorías de productos) al índice de búsqueda.

Cuando haya terminado de seleccionar atributos, haga clic en Hecho.
Luego haga clic en Guardar para que SearchWP pueda empezar a reconstruir su índice de búsqueda basándose en la nueva configuración.
Si desea limitar el widget solo a productos y eliminar otros tipos de contenido de los resultados, consulte nuestra guía sobre cómo limitar los resultados de búsqueda de WordPress.
Su motor de búsqueda ahora está optimizado para productos de WooCommerce. El último paso es añadir el widget de búsqueda a su sitio.
Paso 4: Agregar Búsqueda de WooCommerce a su Sitio Web
Ahora necesita crear una barra de búsqueda para que sus clientes puedan buscar los productos que desean.
Si necesita usar un widget o un bloque para crear la barra de búsqueda, dependerá del tema que esté utilizando. Un widget de búsqueda de WooCommerce es su mejor opción si está utilizando un tema clásico. Por otro lado, si está utilizando un tema moderno de FSE (edición completa del sitio), entonces utilizar un bloque de búsqueda de WooCommerce es el método estándar.
Puede añadir una barra de búsqueda en cualquier lugar de su sitio web, independientemente del método que utilice. Aquí le mostramos cómo puede añadir la búsqueda de WooCommerce a su sitio web en ambos casos.
Paso 4.1 Añadir widget de búsqueda de WooCommerce para temas clásicos
Puede añadir un widget de búsqueda personalizado de WooCommerce en cualquier lugar de su sitio si su tema lo admite. Veamos cómo puede añadir el widget a la barra lateral.
También puede colocarlo en cualquier lugar de su sitio, como la cabecera y el pie de página. Depende de sus necesidades, pero el proceso es similar. Simplemente navegue a Apariencia » Widgets desde el panel de WordPress.

En la página de configuración de widgets, seleccione el área donde desea añadir el widget y haga clic en el icono +.
En este tutorial, añadiremos el widget de búsqueda al área de la barra lateral de WooCommerce. Escriba SearchWP en el campo y, a continuación, seleccione el bloque de widget Formulario de SearchWP.

Una vez que se agrega el bloque SearchWP Form, puede hacer clic en el menú desplegable y seleccionar un formulario de búsqueda.
Luego, haga clic en Actualizar en la esquina superior derecha.

Su barra lateral ahora tiene un widget de búsqueda de WooCommerce personalizado.
¡Ahora visita el front-end de tu sitio web y ve tu widget de búsqueda de WooCommerce en acción!
Paso 4.2 Añadir bloque de búsqueda de WooCommerce para temas modernos de FSE
Antes de mostrar la barra de búsqueda, necesitarás crear un formulario de búsqueda. El proceso es rápido y fácil con SearchWP y no implica escribir ningún código.
Para crear un formulario de búsqueda, ve a SearchWP > Formularios de búsqueda y haz clic en "Añadir nuevo".

Elija un nombre para su formulario de búsqueda, seleccione un diseño de tema y configúrelo según sus necesidades.
Tenga en cuenta que SearchWP le permite configurar varios Motores, aprovechando los cuales puede servir contenido diferente en diferentes ubicaciones de su sitio web.

Elegir SearchWP como página de Resultados le da control total y optimización de la página de resultados de búsqueda de WordPress.
Aquí tienes un tutorial detallado sobre cómo optimizar la página de resultados de búsqueda de WordPress.

Una vez que haya terminado de configurar el formulario de búsqueda, haga clic en Guardar.
Si está interesado en aprender más, aquí tiene un tutorial detallado sobre cómo crear un formulario de búsqueda avanzado en WordPress.

Ahora, abra la página donde desea mostrar la barra de búsqueda en modo de edición.
Haga clic en el icono “+ Añadir bloque”, luego busque y seleccione el Formulario SearchWP de la lista de bloques.

Una vez que se agrega el bloque Formulario SeachWP, puede seleccionar el formulario que acaba de crear.
Simplemente haga clic en el menú desplegable para hacerlo.

Ahora debería ver la barra de búsqueda mostrada en la ubicación deseada.
Por último, puede hacer clic en el botón Actualizar o Publicar en la esquina superior.

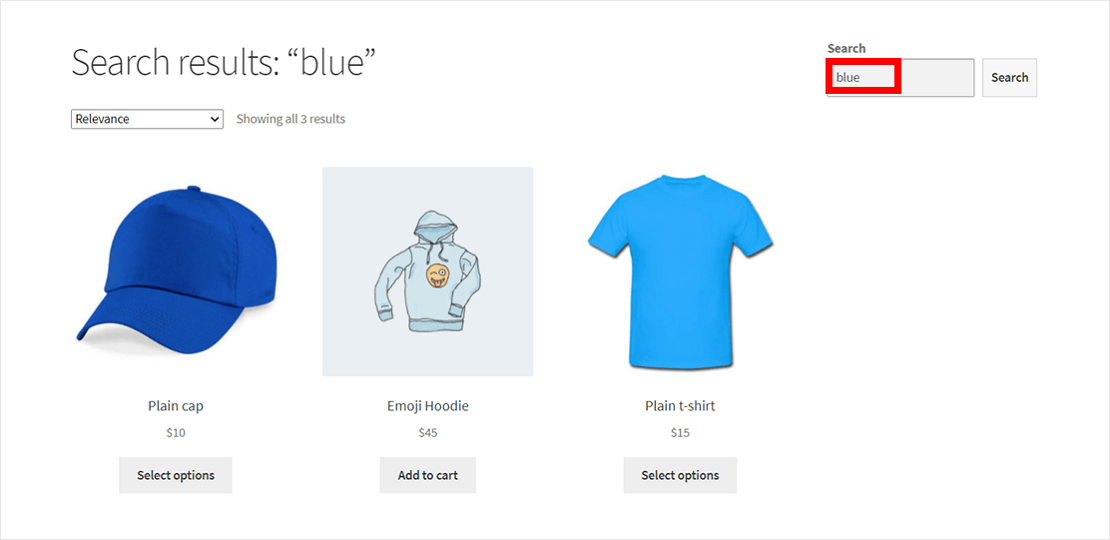
¡Ahora visita el front-end de tu sitio web y ve tu búsqueda de WooCommerce en acción!
Puede buscar diferentes productos para comprobar si la búsqueda funciona correctamente.

Preguntas frecuentes sobre widgets de búsqueda de WooCommerce
1. ¿Qué es un widget de búsqueda de WooCommerce personalizado?
Un widget de búsqueda de WooCommerce personalizado es un formulario de búsqueda colocado en su sitio y conectado a un motor de búsqueda configurado. A diferencia de la barra de búsqueda predeterminada de WordPress, busca atributos de productos, variaciones, etiquetas y campos personalizados. Puede colocarlo en cualquier área de widget o página utilizando un plugin como SearchWP.
2. ¿Requiere SearchWP la extensión WooCommerce Integration para buscar productos?
SearchWP indexa los productos de WooCommerce como un tipo de publicación por defecto. La extensión WooCommerce Integration agrega un comportamiento específico del producto, incluidas las reglas de visibilidad, la compatibilidad con la clasificación del catálogo y el manejo correcto de la búsqueda del archivo de la tienda de WooCommerce. Se recomienda para cualquier tienda de WooCommerce y está incluido en el plan SearchWP Pro.
3. ¿Puedo agregar un widget de búsqueda de WooCommerce a mi encabezado o pie de página?
Sí. Si su tema admite áreas de widgets de encabezado o pie de página, navegue a Apariencia » Widgets, abra el área de widgets de encabezado o pie de página y agregue el bloque de Búsqueda. Para temas FSE, puede incrustar el bloque Formulario SearchWP directamente en la plantilla del encabezado o pie de página a través del Editor del sitio.
4. ¿Por qué la búsqueda predeterminada de WooCommerce no encuentra productos?
La búsqueda predeterminada de WordPress ejecuta una consulta SQL LIKE básica contra los títulos y el contenido de las publicaciones. WooCommerce almacena atributos de productos, etiquetas, SKUs y variaciones en tablas de base de datos separadas como meta de publicación y términos de taxonomía, que la búsqueda predeterminada nunca lee. Un plugin como SearchWP crea un índice personalizado que incluye todos estos datos.
5. ¿Puedo crear diferentes widgets de búsqueda para diferentes páginas?
Sí. SearchWP te permite crear múltiples motores de búsqueda y vincular cada uno a un formulario de búsqueda diferente. Puedes tener un motor de búsqueda solo de productos que impulse un widget en la página de tu tienda y un motor de búsqueda de todo el sitio independiente que impulse la barra de búsqueda en tu encabezado. Cada motor puede configurarse para buscar diferentes fuentes y atributos.
Ahora tienes un widget de búsqueda de WooCommerce personalizado en tu sitio, impulsado por un motor que entiende tus productos. Con SearchWP indexando los atributos de tus productos, etiquetas, variaciones y campos personalizados, tus clientes pueden encontrar lo que necesitan, sin importar cómo lo busquen.
Esperamos que este artículo te haya ayudado a aprender cómo agregar widgets de búsqueda personalizados de WooCommerce. También puedes consultar nuestras guías sobre cómo restringir la búsqueda de productos de WooCommerce solo al título y cómo ocultar un producto de WooCommerce de los resultados de búsqueda.
¿Listo para mejorar tu búsqueda de WooCommerce? Puedes empezar con SearchWP aquí.


